|
About this Walkthrough The maps of the levels are based on ecco's sonar map of the level, the numbers identify key features that are need to finish the levels, currently vitalits are not marked on the maps, any references to the numbers on the maps in the text explaining the maps will be in brackets i.e. for number 1. in the text it will be (1). If a part of a map is in thin lines rather than the normal dark lines it means than it is part of the map that you should ignore, I just put it on so my map would look more like the map in the game. If you wish to print this walkthrough it can be downloaded in pdf format here. |
|
Level 1. Aquamarine bay 
You start at (1) and the dolphin at (2) will straight away talk to you. I would advise you try out each on the moves that the dolphin suggests (talk to it after each one to get the next move, look in the manual if you don't know how-to perform the move!) to you familiarize yourself with the games controls. After you are finished there you can go to the dolphins at (3) and play 'find the fish' when you are ready to continue go to the mother whale at (5) and talk to her. Around now the game should be interrupted by a cutscene that shows a foe ship crashing into the shield and damaging the guardian as well as blocking the gateway at (4). Talk to the mother whale and you will find the baby whale is lost, it is trapped behind rocks at (6), swim behind them (ecco is small enough to get between some of the gaps between the rocks) and talk to the baby. Then go and talk to the dolphins at (3), they will offer to help, lead them back to the baby whale at (6) and once you get close to the rocks the game will be interrupted by a cutscene showing the dolphins freeing the baby whale by moving the rocks, go talk to the mother whale at (5), she will tell you to meet her at the waterfall and begin to swim away, follow her and in a few seconds a cutscene will begin showing ecco exiting the level. |
|
Level 2. Perils of the coral reef 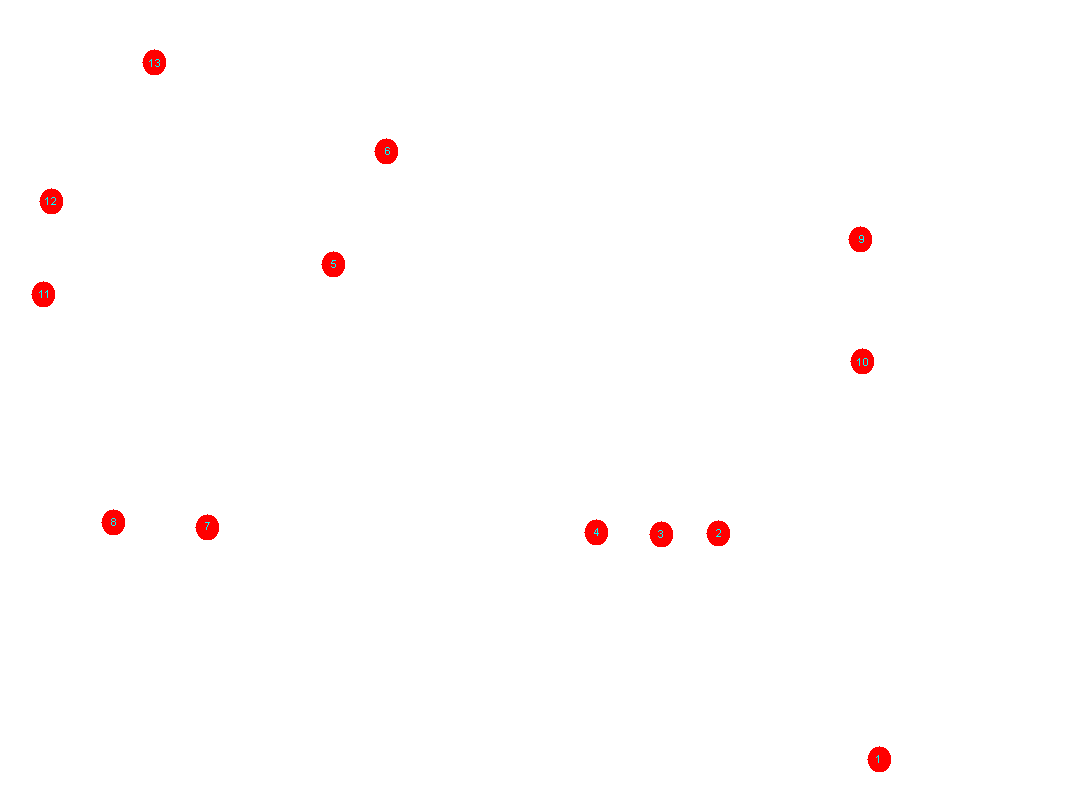
You start at (1), swim to (2) and talk to the dolphin there, he will tell you to find his brother who is playing with his turtle, jump over the wall of the pond at (3) to get to the pond on the other side. At (4) you will find a turtle being attacked by sharks, kill all the sharks in the area and a dolphin will swim up to you and give you the turtle song, go back to (2) and talk to the dolphin again then go back to (4), the dolphin from (2) will follow you and give you the shark song. Swim to (5), you will find a dolphin there chasing a fast fish, catch the fish and the dolphin will give you the fish song. Now you have two possibilities you can use the dark tunnel (7) or the piranha tunnel (6) to get to the bigs sharks lair. I personally prefer the dark tunnel, to pass the dark tunnel go to (8) and get the glowing fish there to follow you with the fish song, swim through the tunnel starting at (7) to the sharks lair (don't go too fast or the fish won't follow you). At (9) hit the shark with your sonar to make it interested in you, wait until it is close behind you and then swim through one of the holes in the central rock, the shark should get stuck, charge into it's jaws to get the ability to use vigour. Now if you want you can kill the shark using the vigour powerup above the central rock to charge into the shark or you can take the easy way and just exit through passage (10) (you don't need to kill the shark unless you really want to), from the other side of the passage swim past (2), (4), (5) to reach (11), get the vigour power up from behind the rock and quickly swim to (12) and charge past the glowing point into the small passage behind it to exit the level. (Note# the section behind (13) is not accessible from this level, you get to it from a later level in the game.) |
|
Level 3. Trial without error 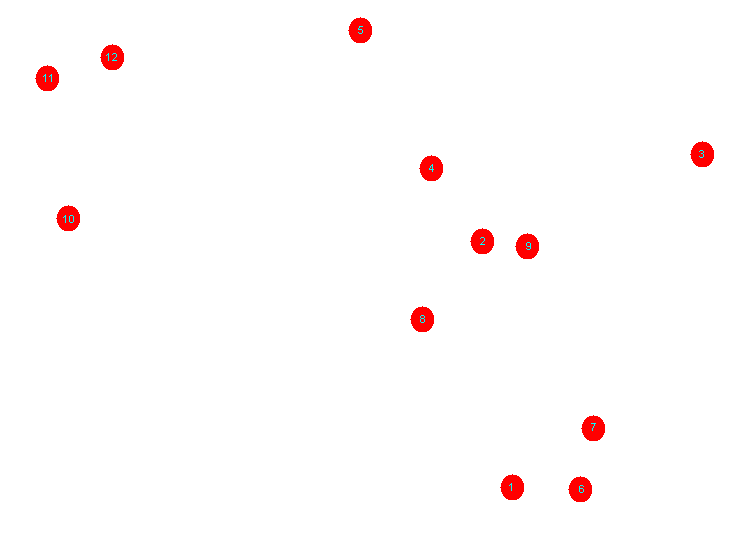
You start the level at (1), swim to (2) and talk to the dolphin there, she will ask you to find her 3 baby dolphins. You don't need to find them to complete the level but if you want to find them anyway, the first one is at (3) the second is hiding at (4) and must be caught, the third can be found at (5) after you kill the hammerhead sharks in this area. After you find all the baby dolphins or if you don't want to find them. Swim to (7) and kill all the sharks (there is a vigour powerup at (6) that makes it easier), after all the sharks are dead talk to the dolphin at (6), then go to (8) and meet the dolphin there, get the vigour power up at (9) and use it to push the loose rock at (8) down to reveal a hole. Swim down and see the octopus, swim back out and talk to the dolphin, he will swim in, talk to him after he goes in, he will have a plan - he will let himself be caught to distract the octopus so you can get past. Let him go and get caught, and while the octopus has him in it's tentacles quickly swim past the octopus to exit the level. (Note sections (10), (11), (12) are used when you return this level later in the game.) |
|
Level 4. Four ways of mystery 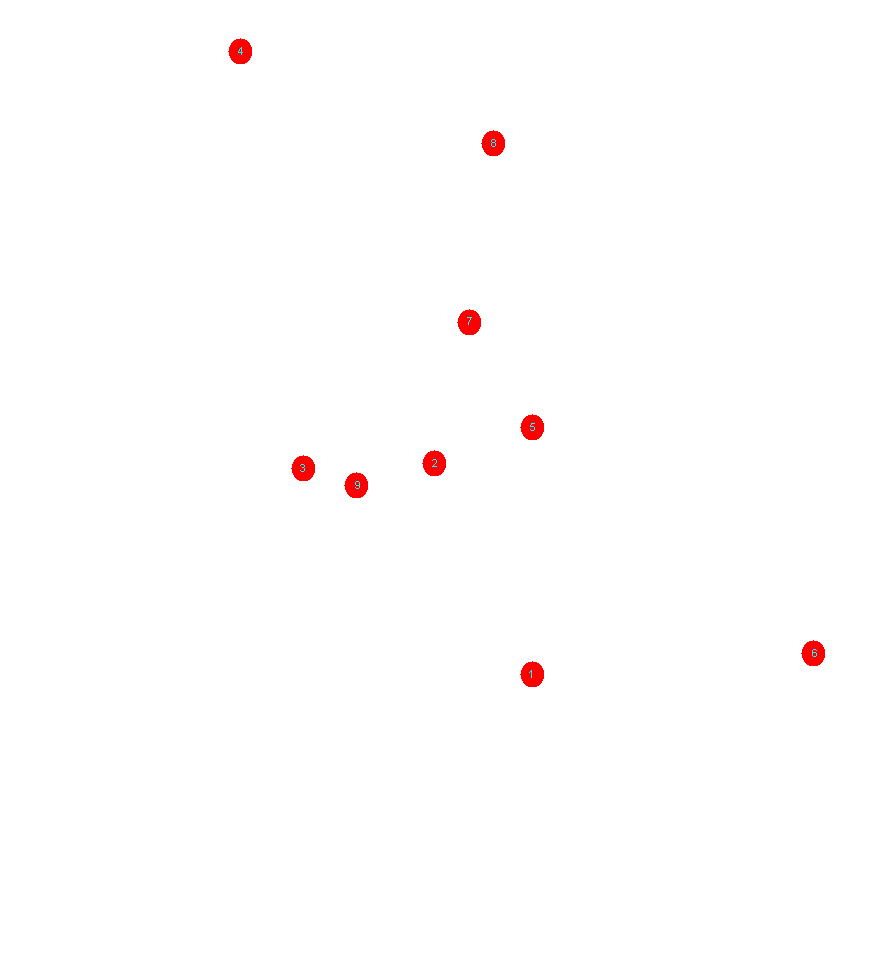
You start at (1), swim to (2) and get the ability to use the power of air there (there is also a jet of bubbles coming out of the floor that can be used to refill you air meter. Swim to (3) and navigate through the passages to (4) (hint: hit the sea anemone with your sonar to make them close so you can safely pass them). At (4) talk to the dolphin, he will ask for a fish, return to (2) and look around you should see a fast blue and yellow fish swimming around the area, charge into it to catch it. Take it back to the dolphin at (4) and the dolphin will teach you the song of the ray. Return to (2) and swim through the passage starting at (5) to get to (6), you will find a large manta ray there, position ecco so that the ray is between ecco and the passage leading into the pool and use your sonar on it, the ray will turn and swim in the direction your sonar is going, follow it through the passage hitting it with ecco's sonar to keep it facing the direction the passage is going until you reach (2) again. From there point the ray towards (7) and get it underneath the giant moray eel, once it is in place you should be able to safely pass by the eel. Swim along to (8) and push a the rock down the hole to pass the current, once you get past the current turn into the left passage left and navigate through the passages until you reach the end of the longest one at (9) to exit to level 2 ('Perils of the coral reef'). You will arrive at position (13) on the level 2 map, get the ability to use the power of sonar from the nearby crystal and then use the sonar powerup to blast through the barrier at (13) and enter the main part of level 2. Exit level 2 as before to go to level 3. Once you reach level 3 swim to (11) on the level 3 map and get the vigour powerup, swim to (12) and use the vigour to get the sonar powerup from near the waterfall, swim to (10) and shoot the rock that looks like a mouth with teeth to make a hole, swim through the hole into the passage behind to exit to the level 'up and down' (level 7) |
|
Level 5. Passage from genesis Since this is just a bonus level that doesn't need to be completed to finish the game I will not be writting a walkthrough for it at this point. See the walkthrough for the level 'up and down; for details how to get to this level. Note# this level doesn't have an exit, simply swim back out the entrance when you are finished playing around with it. |
|
Level 6. Pathways from nowhere Since this is just a bonus level that doesn't need to be completed to finish the game I will not be writting a walkthrough for it at this point but I do have these maps of the level that were sent in by fans you can use. 1 2-1 2-2 See the walkthrough for the level 'up and down; for details how to get to this level. Note# this level doesn't have an exit, simply swim back out the entrance when you are finished playing around with it. |
|
Level 7. Up and down 
You start the level at (1), at (3) there is a loose rock sitting on the ground, push it into the hole at (4) and follow behind it down through the current, get the sonar powerup. If you now want you can hit all four of the columns at the bottom of the hole with the 'power of sonar' to open the circular door and access the bonus level 'Passage from genesis'. To continue the level you need to swim back up to the large rock at (2) and hit it with the power of sonar, this will break the rock making a large hole in the roof of the cavern. Only you swim up into the hole you will be sucked up by the current, be sure to get the first powerup right at the beginning on the vent or you will constantly lose health the whole way up and die. To survive going up the shaft you should simply stay as close to one of the sides of the vent as most of the obstacles you need to avoid are in the middle of the vent. Once you reach the surface you will be deposited at (5), you can at this point take the 5 crystals scattered around the pool to the ring to stop the wind blowing over one side of the pool, and then jump to the next pool to access the bonus level 'Pathways from nowhere'. (The crystals are located as follows; Two just on the floor of the pool. One behind the long thin rocks by the vent in the floor of the poll. The final two are floating above the pool. If you accidentally fall down the water fall trying to get them, you can renter the vent leading up to the poll by leaping up and into the water fall just above where it hits the water) Or to continue the level simply swim over the waterfall at (6) and you will fall and land at (7). At (8) there is a stingray on the pool floor and a turtle swimming around. Hit the turtle with your sonar to make it follow you, position the turtle above the stingray and charge into th turtle to make it drop onto the ray, the ray will move, the powerup that gives you the ability to use stealth is in a hole below it, get ability, then get the stealth powerup at (9). Swim past the mirror at (10) while the stealth powerup is active to exit the level. |
|
Level 8. Roaring forces 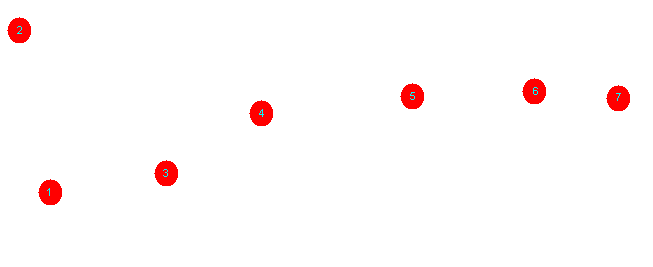
You start the level at (1), get an air powerup at (2) get the stealth powerup at (3) swim into the passage at (4). A giant eel that shoots lightning will start to chase you, simply swim up and then down constantly to avoid the lightning bolts, after a while you will reach a part of the passage where the roof will fall in stopping the eel at (5). There is a panel of buttons in front of you push the two buttons with dolphins pointing to them by charging into them to open a hole in the roof. Swim through it to get to (6), touch the glowing ball at (6) and ecco will begin to glow, touch the small eel swimming around the outside of the area to morph into it. Swim through the grill at (7) to exit the level. |
|
Level 9. Atlantis lost 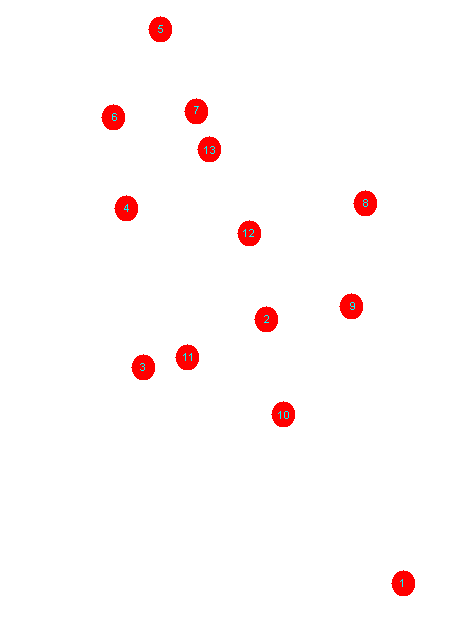
You start the level at (1), swim to (2) and talk to the guardian. Then go get the first your crystals and bring them to the guardian one at a time, they are located as follows; The first is in plants at (3), The second is behind a reef in a shallow area at (4), The third is locked behind the barrier at (6) get the sonar powerup at (5) and use it to blast through the wall to get into the passage behind it there the crystal is, To get the fourth go to (7) at the bottom of the canyon, push the rock into the hole with the current going into it and then the current will stop and you can go down and get the 4th crystal. At this point the doors to the buildings (8)(9)(10)(11) will be usable, go inside each building and look at the exhibits (hit with your sonar to light them up), then go to (12) there should be four balls around the base of the inside of the building, hit them with your sonar to see 'projections from each of them'. Then swim to the surface, you will have probaly noticed rings appearing in the air as you brought the crystals to the guardian, you now need to jump through every one of them (they will vanish once you pass through them). Go to (13) the four rings there should be powered up now (they should be rotating), get the vigour powerup from just past (7) at the end of the canyon and swim up through the rings as fast as you can, you will be propelled fast and will blast out of the water above the dome of the building (12) and should be able to grab the fifth crystal floating above it. (It will probaly take many trys before you get the aiming right and grab it) Once you get it take it to the guardian to exit the level. |
|
Level 10. Descent of the foe (cutscene) |
|
Level 11. Vortex of time (cutscene) |
|
Level 12. Shrine of controversy 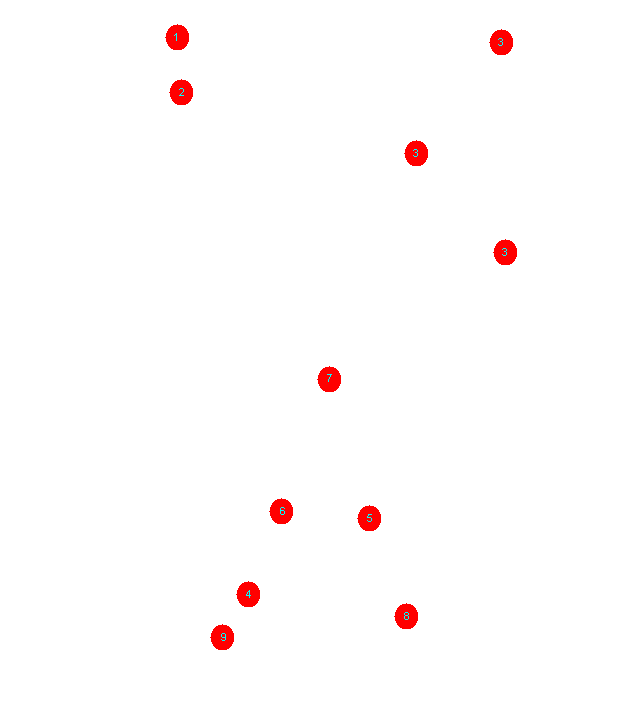
This level is great in depth, you start with a at the top of the level with a map like the one with (1) and (2) on it, as you swim down you change to the map with (3) and the other map when you are near the bottom. You start at (1), to open the temple doors at (2) you need to get help from the three clans of dolphins below you. Start by swimming down to the platforms marked (3) and find the one belonging to the crimson dolphins and talk to the dolphin there, he will refuse to talk to you because you are not crimson, swim down further to (4) (the entrance to the passage looks like a giant cog wheel) swim to the chamber at the end of the passage and dip ecco in the red stuff to become a 'crimson', swim back up to the the crimson dolphin and talk to him, he will decide to help you now, take him up to the temple and leave him there. Swim back down to the (3) platforms and find the one belonging to 'the movers', the dolphin there will refuse to talk to you, swim down and talk to the dolphin at (6), he will swim off follow him into the passage (6) and swim behind him to (7) where you need to fight the leader of the movers, which is simple enough just avoid the things he shoots and charge into him a few times, then he will agree to help, take him back to the temple at (2). Go back down to the final (3) platform and talk the circle dolphin he will also refuse to help you, swim down to (8) and push the handle on the wheel so the wheel turns around completely and stops spewing clouds of gas from below it, swim back up the circle dolphin and talk to him, he will agree to help, go back to the temple and the three dolphins will open the door. Get the control harness from the center of the temple and then swim down to the door at (9) and hit it with your sonar to exit the level. |
|
Level 13. Master of forgotten skills 
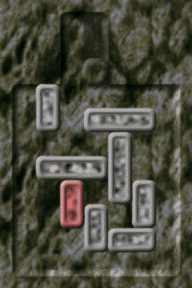
You start at (1) swim up to the surface of the level and go to (2), there is pole with a spinning fan on the bottom of it near the crane, there are three switches on the pole, turn them all on and the crane will pick up the bulldozer and drop it at (3). To move the bulldozer hit it once with your sonar and the bulldozer will start traveling in the direction your sonar is going in, hit it a second time to stop it (it will also stop if it hits something), if the bulldozer stops next to and is facing the end of one of the carts it will latch onto it and if you move the bulldozer forwards and backwards while it is attached it will pull the cart along with it, to make the bulldozer let go of the cart turn the bulldozer. Once you have got the hang of controlling the bulldozer you need to rearrange the carts so that the one full of rocks (not the half full ones) can be moved to (4), once that is done the door will open and you can exit the level. If you have trouble rearranging the carts I have an animated gif showing the solution to the crate puzzle that was sent to me by a fan, you can find it here |
|
Level 14. Process that never ends 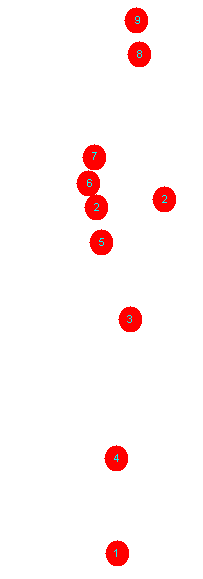
You start at (1), swim to the area of tunnel between the (2)s and look through the glass for a dolphin, talk to him and he will turn the power on. Swim to (3), depending on how far you went into the passage you may be stuck behind the rolling spiked drums, if you are swim into the little areas of the main passage (5) and hit the buttons to raise the rollers. Once you yet to (3) talk to the dolphin swimming around in the area, he will suggest that something is stuck. Swim to (4), and help the other dolphins push the cart (if they don't come up and push the cart you may need to talk to them again to get them to move). Once the cart is pushed forward, rocks will start to run along the conveyor belt through the spiked rollers. Swim into the area (5) and hit both the buttons, swim back out and continue along the passage towards (8), the first two rollers will be raised so you can swim under them (they only stay up for a limited time, so you may need to hit the switch again if you are to slow and them go down before you go under them) The next roller opens for a short time while a rock is going through them, you need to dart through while the rollers are apart. Swim into the area off the side of the passage before the next rollers (6) and hit the button with a single wheel on it again. Quickly swim past another pair of rollers that opens while a rock is going through, then swim under the single raised roller before it goes down again. At (8) you will find sand on the conveyor belt has stopped the rocks, push them into the crusher (9) and wait for the crusher to crush them all (if the rocks are right on the edge of the area you may need to nudge them out into the center so the crusher can reach them. Once all the rocks have been crushed the floor will open allowing you to swim down to exit the level. |
|
Level 15. Blades in motion 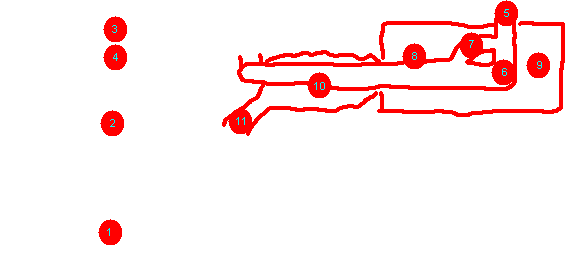
You start the level at (1) swim down through the hole in the floor and swim against the current to (2) a sonar powerup is above one of the beams over the water jump up and get it, quickly swim over to (3) and use the power of sonar to make a hole in the cracked glass, swim into the center (4). The swim down, there are several rotating blades just in front of a rotating plate with only one hole in it that is rotating in the opposite direction, dart through the holes and continue down. At this point the top down view of the sonar map is not much use, I have made a side on drawing on the next section (in red). After you pass all the rotating blades, you arrive just above (5), get the sonar powerup and swim down through (7) (not through (8) the heat in (8) hurts you), use te power of sonar to break through the pipe at (8) where there are cracks, refill you air at (9), get the sonar powerup that is in the same chamber and renter the pipe at (8), make a hole in the pipe at (10) with the power of sonar, swim out of the pipe and down through (11). You now will enter a chamber with a boss, hide on the floor of the chamber, then the boss comes out of it tunnel to attack charge into the area on it's belly with the large circular scales to hurt it, hit it three times and it will fall through the floor making a hole. Swim down through the hole, in one direction along the new passage you arrive in there will be a school of fish, swim in the opposite direction from the fish, you will reach a section of passageway that has balls floating in the joins between sections of passage, hit them with your sonar to light them up. Swim along the passage and light up all the balls, at the end of the passage there is an air vent you can refill you air from. Turn back around and swim back to the point below where you entered the passage and swim past the school of fish. Continue along the passage lighting up all the balls, once you get to the end of the passage provided you have lit up all the balls, the end passage will open and you can exit the level. |
|
Level 16. Perpetual fluidity 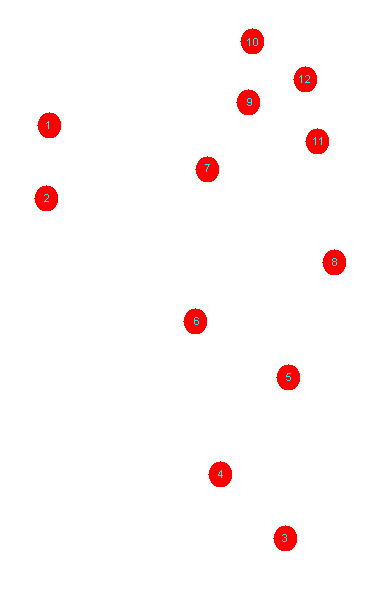
You start at (1), get the sonar powerup at (2) and use it to clear the passage ahead of you of the sharp red things. Swim along the passage to (3). Here you encounter a room full of mines, they will explode if you pass through one of the red beams of light, swim past them to (4). Hit the switch to open the door and swim to (5), then to (6). Hit the switch and swim to (7). Don't hit the switch in this room yet, swim into the passage below the one you entered from to reach (8), hit the switch at (8) and swim back to (7). Hit the switch at (7) now and swim through the passage to (9). Hit the switch to open the door, swim to (10) hit the switch, swim back to (9) and hit the switch again. Swim to (7), due to all the switches you have been hitting raising the water level there is now a white tunnel near the surface that is now accessible, swim through it to (6), use the low down tunnel to swim to (5), swim to (8), swim through to (11). At (11) hit the switch and use the power of sonar to clear the half blocked pipe, swim through the passage towards (12) to exit the level. |
|
Level 17. Obscure ways to terminus 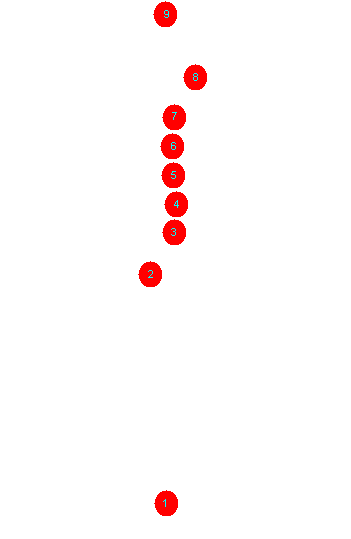
You atart at (1), swim to (2) and let the current pull you through the pipe to (3). Now don't let the current pull you on, jump over the barrier to (4). Repeat the precess until you are past (4),(5),(6),(7). At this point swim into (8) and let the current bring you around to the other side of the wall, swim into (9) to exit the level. |
|
Level 18. Sleeping forces of doom 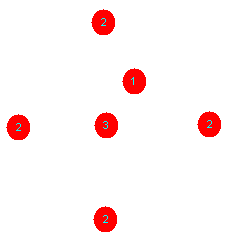
You start the level at (1). The area you are in is as follows, a current rotates around the area but not out at the sides or at the top or bottom of the level. There are vents in the floor of the level, through all of them crystals enter every now and again but through two of them air bubbles also come. There are two rotating shields that surround a bright core in the middle (3). There are snakes heads in the places marked (2). What basically happens in this level is the crystals enter the level and rotate around the level due to the current, the snakes heads periodically grab a crystal and with it emit a beam at the central shields that repairs them. To complete the level you need to destroy the shields around the center, this can be done by hitting crystals either floating around the level or in the snakes grasp with your sonar making the m bounce into the shield. Each time a crystal hits the shields it destroys a segment, but the snakes heads are constantly fixing the shields. You can't attack the snakes directly but if you break a hole through the outer area of the shields and the inner and then hit the center with a third crystal, a beam of bright light will shine out from the center, damaging everything in it's path. (snake heads and ecco included) You need to use this to destroy all the snake heads (the damage you cause is stored so don't be afraid to die), once all the snakes are dead destroy the shield and swim down through the hole in the center of the level to exit. |
|
Level 19. Twisted realities (cutscene) |
|
Level 20. Anguish of dearth 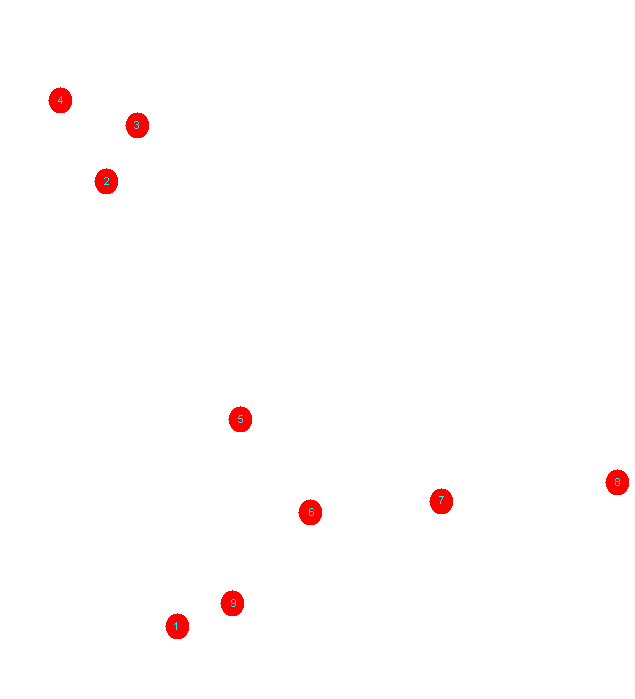
You start at (1), swim to (2) and jump over the rocks blocking the passage, get the sonar powerup at (3), use the power of sonar to clear the rocks at (2). Get the school of red fish at (4) and use your sonar to make them follow you, take the fish to (5) and go to the dolphin inside the building, talk to the dolphin swimming around outside, he will thank you and offer to help then swim off. Follow the dolphin to (6), at this point he will begin to swim to (7), the dolphin will hit the plants along the way making clouds of ink reveal the stinging vines. Follow him to (7) being carefully to avoid the vines. At (7) the dolphin will teach you the 'song of plants' so you can make the plants shoot ink. Use that ability to reveal the stinging vines and get to (8) to exit the level. (Note# (9) should be ignored for now it is only of use when you return to this level later.) N.B. there is an Alternative way to complete this level, if you find the large fish near (3), you can use the power of stealth to enter it's mouth and hence exit the level. |
|
Level 21. Entrapment 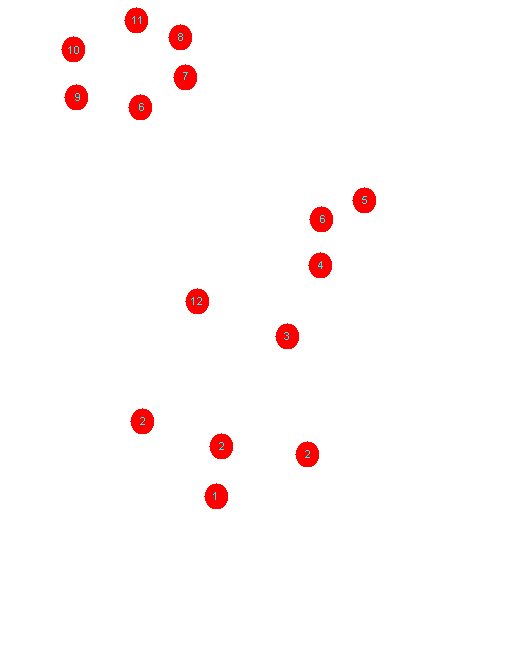
You start at (1), hit one of the trumpet plants at (2) and them swim and get the stealth powerup at (3), you should be able to now pass the gates at (4). Charge into the switch at (5) to open the door at (6), enter the building. You will enter the building at (6) (I am referring to the enlarged map of the inside of the building at the top left of the map now). Swim into the room (7), hit the switch to open the door to (8), swim to (8), hit the switch at (8) to open the door and swim through the passage to (9). There are two switches in room (9) the first opens the door back out to (6) the second opens the door leading to (10) (The passage just above where the (6) is on the map. Hit both switches and swim through the doors to (10) before them close. Hit the switch at (10) and swim through the passage to (11). In (11) hit all the wires holding the prisoner at the point they connect to the wall to destroy them and free the dolphin (you don't need to kill the clan member in the room), once the dolphin is free a cut scene will start which will take you and the dolphin to (12) (on the main map). You need to get the dolphin to (1), hit him with your sonar to get him to follow you, if he is hurt by an attacking clan member he will swim away and return to (12) you need to protect him. Once you get to (1), you will return to the previous level 'Anguish of dearth' at (8) on the level 20 map (WARNING turning off your Dreamcast at this point doesn't save your position (In the PAL version at least), you must complete the next section immediately or "Anguish of Dearth" will reset and you will need to complete Entrapment again), swim back to the village and kill all the attacking sharks. Then talk to the dolphin in the building at (9) (on the Anguish of dearth map), he will move a rock revealing a passage, swim through it to exit to the next level. ('caverns of hope') |
|
Level 22. Caverns of hope 
You start at (1), at (2) you will encounter a dolphin throwing spiked shells, doge the shells and hit the dolphin with you sonar to stop him from attacking you. Swim to (4) using the same method to deal with all the other dolphins you meet on the way, The (3)s are where air can be found. At one point you will need to jump over two lots of rock blocking the passage. At (4) there is a glowing globe behind some of the giant plants/shells, once you get near it a cut scene will start showing the clan arriving through the roof. Swim to (5) and talk to the dolphin there, he will begin to attack the barrier at (6), once he breaks through, he will swim through, follow him. You need to travel with him to (10) passing (8) and (9) on the way. Along the way members of the clan will try to attack him, if he is hit he will turn around and start to swim back to (7), hit him with your sonar to get him to turn around. To stop him from being hit I would suggest hitting the clan members with your sonar and then charging into them (they will run away after one hit) to reduce the chances of them hitting the dolphin. Once you get to (10), the dolphin will break through the barrier, swim to (11). At this point you have to fight an alligator, there are two ways to fight this boss, you can use the power of sonar to knock the stalactites off the roof so they hit the alligator, or you can just charge into it's belly. Since it is very hard to hit the alligator with the stalagmites I would suggest charging into it's belly. The method I found best was is to approach the alligator, when it chases you swim into the stalagmites on the floor (he is too big to fit between them), once he turns away charge after him and hit him from below and behind (if he is facing you when you charge he will most likely grab you and take half your life bar), repeat this until you have hit him 4 times, at this point he will crash through the back wall of the chamber (12) making a hole you can exit through. Swim to (13), at this point you need to swim up a shaft and jump over some rocks to reach the surface, swim to (14) to exit the level. |
|
Level 23. Lair of evil 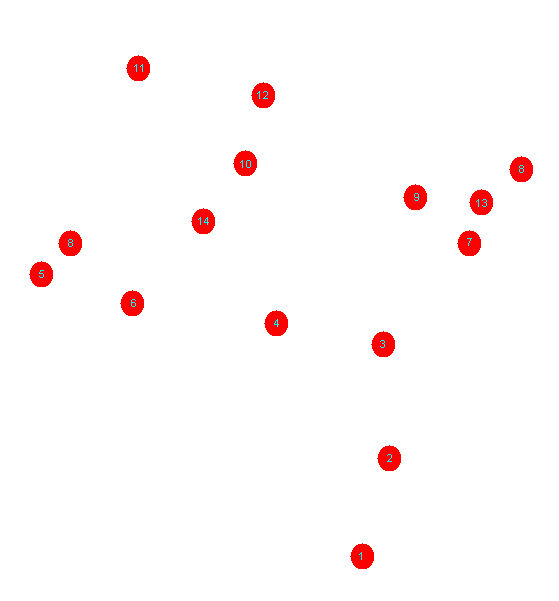
You start the level at (1), swim down passage (2), at chamber (3) swim up through the hole in the roof and in the chamber above it swim out passage (4). In chamber (5), you will meet a dolphin who will say you are a spy and attacks you, you need to swim into passage (6) but the door will be closed, the dolphin who tries to attack you has a level 2 rank so if he comes near the door it will start opening for him, simply wait by the door until he swims up to you and exit through the door before he causes too much damage (he won't follow you out the room) once you are past the door (6), proceed down the passage (there are tubes on the side of this passage you can use to boost yourself along at high speed), when you reach the printing room (7), hit the switches at the side of the giant clam shell with your sonar, to open it and drop some ink in it, swim into the shell and hit the switch that is facing towards the shell, the shell will close on you printing a mark on your side (this allows you to pass doors containing that mark), swim back to chamber (5) and swim down passageway (8), to the chamber (8), from there go down passage (9) to (10), talk to the dolphin there and he will ask you to follow him, he will lead you to (11), swim down the passage he indicates (12) to (13). To your left when you enter the room (13) there is a star shaped glowing object, hit it with your sonar (to stop the propellers in the middle of the room), get the sonar powerup and use it to blast away at the seaweed stuck on one of the propellers until it is destroyed, hit the star again to restart the propellers. Swim back to the printing room (7), you will now be able to change the symbol on the dial at the back of the shell by hitting the button on it (change it to the symbol with three lines instead of the one with two), get yourself printed on again by the shell (you will now have a mark of higher rank so you can now open all doors), go to the large chamber (10) and swim into the end of the pipe starting at (14), swim straight along it to exit the level. |
|
Level 24. Powers of Levitation 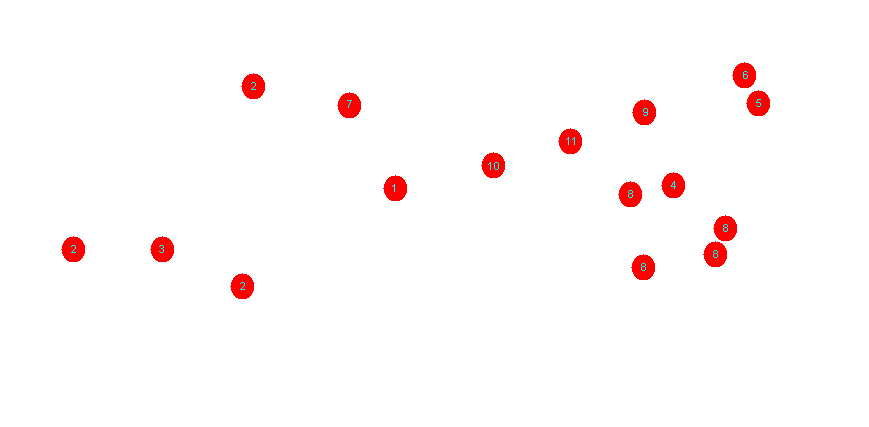
You start at (1), swim to all the areas marked (2), swim through the fronts of them, hit the switch to turn of the propellars and quickly dash back out before the propellers start going fast, after all three are started go to the glyph at (3), swim under the ledge the glyph is on to get into the building, swim straight down, you will arrive on the lower map at (4), swim to (6), enter the rippling wall hiding the chamber (5) and get the stealth. At this point you can charge into the right yellow hole in the floor at the opposite side to the entrance of the room to play a hidden game of dolphin soccer. (If you play the game you will need to restart the level 'powers of levitation' to continue the game (there is no way to exit back to the level from the game), also note after you play the mini game selecting "Continue game" from the menu will always take you back to the mini game, you will need to manually select the level via "Load Game" to continue through the game. To continue the game go and talk to the dolphin in room (6), he will swim off, follow him (but not to closely or he will turn back), he will swim to the surface and go to (7), at (7) he will swim down through a hidden entrance in the ground (hidden inside something), you will need to get quickly swim through the hole after him before it closes. Talk to the dolphins down there, go and talk to the dolphin at (3), go into the lower levels of the building (you now can access the ring shaped passageways you couldn't before). Hit all the switches in the rooms marked (8), swim into the outside ring and go into room (10), fight and kill the dolphin there, charge into the switch, swim into the chamber that runs from (11) to (9) by the entrance at (11), talk to the whales, return the shaft (4) and swim all the way to the top of it, help the two other dolphins at the control station to exit the level. (If the dolphins say you haven't powered up all eight power stations, check that all the fans at (2) are on, check that all the switches at (8) have been pushed and the switch in (10) has been pushed and you have talked to the whales at (11) ) |
|
Level 25. Hanging waters 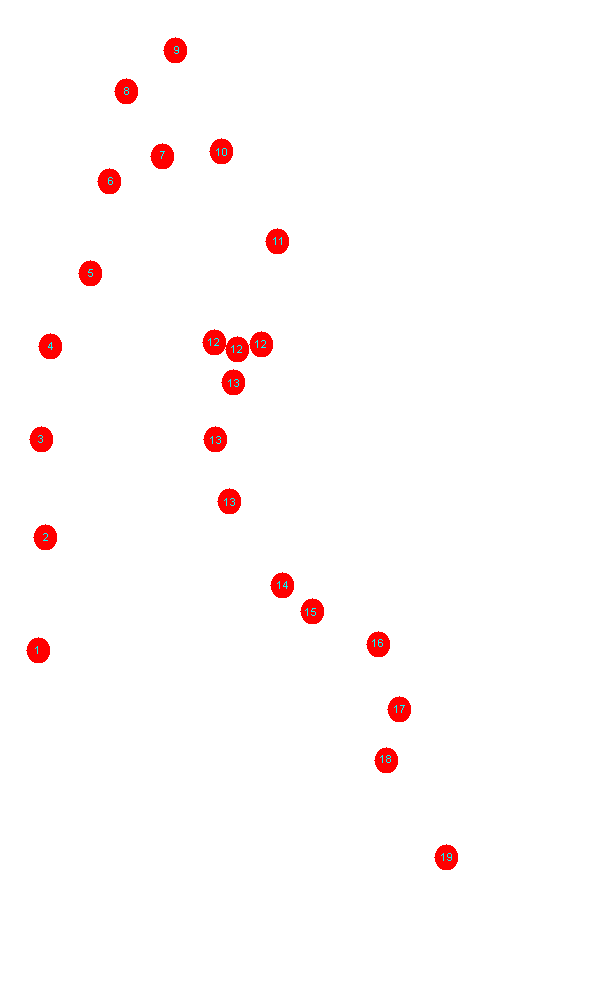
You start at (1), there are several barriers in the pipe that you will have to leap over by jumping out of the pipe at (2). At (3) there is a large floating pool you will fall into after exiting the pipe, in this pool bubbles of water form and float up into the air every few seconds, swim to a dark patch where a bubble is forming and swim to the surface to rise with the bubble, as the bubble rises it will drift towards the pipe at the other side of the pool, jump out of the bubble when it gets near the pipe but time your jump carefully if you go too soon you won't go far enough and if you take too long the bubble will burst. The pipe (4) has a current flowing against you in it, charge against it to get to the next pool. At (5) there is another floating pool but the bubbles here are fixed in place and there are darker bubbles that you can bounce off. Find the lowest bubble and jump into it, then jump into the next highest ones, from here to get from bubble to bubble you need to bounce yourself off the grey bubbles, point ecco's nose at the very top of the bubble and charge at it, if you hit the bubble correctly you will be bounced to the next bubble if you hit too low you will be bounced backwards. With a bit of practice you should manage to get to the top and in the pipe leading on. Jump into (6), hit the object there with your sonar, it will create a temporary pipe (7), quickly swim through it before it bursts, jump to the pipe (8) and swim into the pool (9), you can't see it on the map but there are two pipes (10) one above the other, swim out the exit from (9) into the TOP pipe, at (10) there is a break in the pipe and current is flowing out of the pipe towards you, you will need to jump up and along the top of the pipe to avoid being pushed out by the current. At (11), hit the object to turn on the temporary pipe and jump into anyone of the (12) pipes. Along the pipes at the (13) you will encounter rotating objects you must avoid to continue along the pipe. At (14) there will be more of the objects to hit with your sonar to turn on the pipes, you will have to move along at a good speed or the pipes will burst before you get to the next one. At (15) there are two pipes one above the other, the top one has a current going against you, jump into the lower one and travel along through (16) to (17). Jump into (18) and from there into the pool (19) and swim up the suction pipe in the middle of the pool (it looks like a tree stump), to exit to 'Ice and Fire'. |
|
Level 26. Ice and fire 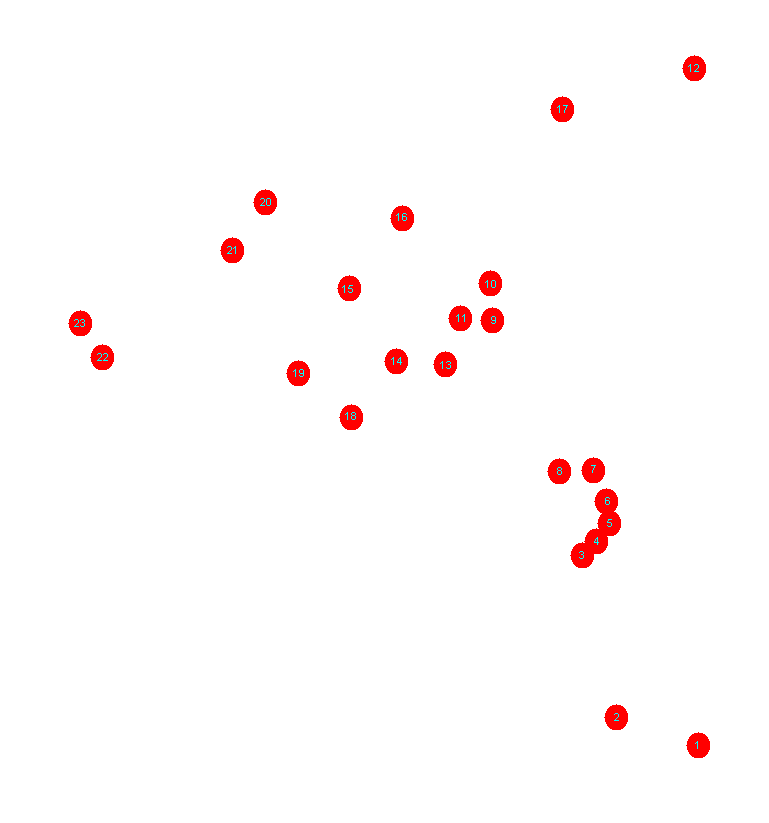
You start the level with a boss fight, you are in a round floating pool with a section of fire in the top middle of the pool and ice in the bottom, there is air and a school of fish at the top to one side (be careful when going for the air as there is nothing above the air and you can jump right out of the pool if you're not careful) The dolphin you are fighting has three states, 'normal', 'ice' and 'fire'. While the dolphin is 'fire' or 'ice' you can't attack it but you an while it is in 'normal'. To get the dolphin to turn 'normal', you need to get the dolphin to touch the opposite to what it currently is (i.e. if it is currently 'fire' get the dolphin to touch the ice.) Once that happens the dolphin will revert to normal and spin for a few seconds, giving you a chance to hit it, after a few seconds the dolphin will dive into the fire or ice and become a ice or fire dolphin again so be quick in hitting it. After hitting the dolphin a few times it will die and you will return to 'floating waters' for the second part of the level. After you defeat the boss you will start in floating waters at (1), swim over the rocks at (2) through the narrow gap at the top. When you get to (3) you will be faced with the barriers you had to pass at the start of floating waters but this time the current is going away from them making them very hard to pass. There are probaly several ways of passing them but my method is; Starting at (3) drop into the tube below you (4), swim forward and jump up into the tube above you (5), once you pass the barrier in the tube below you jump down into the lower tube again (6), swim forward and jump over one barrier, continue forward until you reach the next barrier (7), jump to the middle pipe and from there to the left pipe (8), that will get you past all the barriers and you can continue to (9). In front of you at (10) your way will be blocked by a giant squid, swim into the tube (11) continue along the pipe until you reach (12) at this point hit the three rotating tubes on the side of the rock with your sonar, one of the tubes that the squid is holding on to will burst. Swim through the other pipe back to (9). Swim back into the tube (11), as you start to go down jump out to the side into the floating bubble (13), jump into the pool in the rock (14), jump out into the row of floating bubbles (15),(16) and jump along them until you reach (17), hit the three rotating tubes here to turn off the second tube, drop into the tube below you and use it to return to (9). Swim into (11) again and jump into (13) and then (14) but this time go the opposite direction and jump into the bubble (18), hit the object to turn on the pipe and swim up and into the pipe above you, swim along the pipe and use the next object to turn on the pipe beyond the pipe you are currently in, when you reach (19) hit the three rotating pipes to turn off the last of the tubes and destroy the squid. Get back to (9), hit the three rotating pipes above you to turn back on the three tubes and swim around to (20), at (21) there is a strong current coming out of the pipes, jump over them and continue on to (22), swim up the tube (23) to exit to 'abyss of inferno' |
|
Level 27. Abyss of inferno 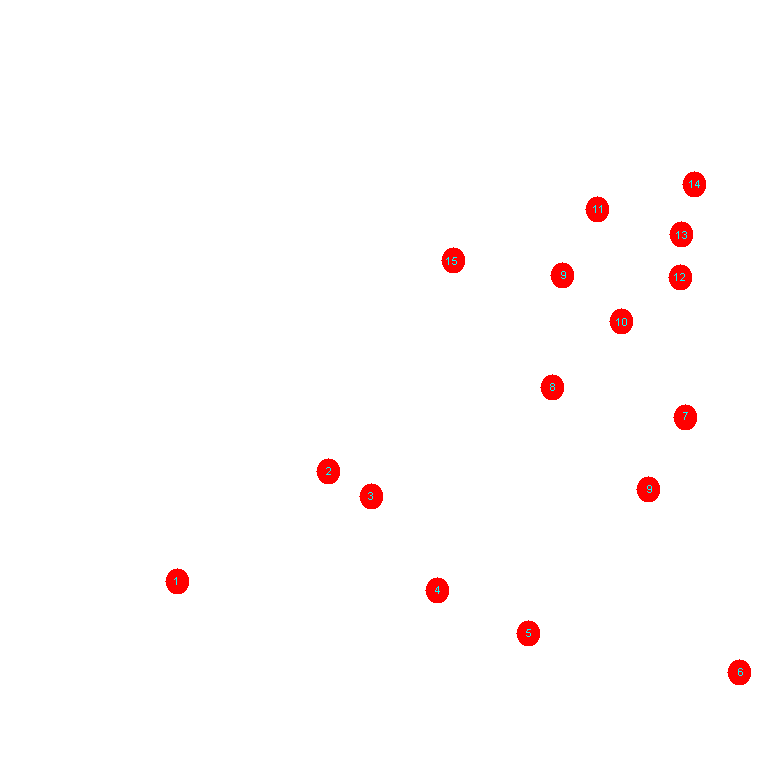
You start in a round pool, there are fish at one side at the bottom, air can be got from the bubbles that come out of the top of the pipes at the top sometimes. There are giant round things that fall from the top of the pool, charge into them to break them up revealing lots of balls, change into the balls to push them around (after you hit one it will explode a few seconds later). Hit the small balls into the clan dolphin to hurt it (It will try to do the same thing to you), after enough hits you will win and exit to the last part of floating waters. You start at (1), swim to (2), swim over the waterfall at (3) you will arrive in a pool with a floating ball of water at (4), jump up into it and exit the area through the pipe. At (5) jump from floating bubble to floating bubble until you get down to the two water tubes, use either of them to get to (6). Swim to (7) and hit the object to turn on the pipe at (8), swim back to (9) and jump from bubble to bubble to get to (8). Swim along the tube (9) (the top one), jump into the water bubbles (10), use the object to turn on the water pipe going to (11), swim through the pipe at (11) and then turn around and use the bubbles to reach (12), jump to the pipe (13) and enter the pool, swim to the hole in the wall at (14) and hit the bird with your sonar, you will see a cutscene with it flying off. Swim back through (13) along the pipe to (9), swim to (15), you will see the bird from (14) at the end of the pipe, hit it with your sonar and it will carry you up to the pool above (2), swim into the central suction tube to exit to 'mutaclone' |
|
Level 28. Mutaclone Since this level takes part in a small arena I don't see the point in making a map... The pool has a collection of yellow egg shaped things on the ground, there is air bubbles coming from the floor in one part. Hit each of the 'eggs' twice to break them, a gas will be released from them that will reverse the controls for a short time (while you are doing this move constantly to stop yourself from being hit by the shots being fired from the dolphin at the top). Among the 'eggs' you will find one larger than the others that constantly produces gas after you destroy it, remember it you will need it later. After you destroy all the 'eggs' swim up, the shield protecting the dolphins will be off now, charge into two of the dolphins to destroy them and the third will start chasing you, swim into the large 'egg' at the bottom (your controls will be reversed since you are in the gas, don't panic, just stop (you are safe from the dolphin here) just and turn and move slowly and you will do fine), turn around and watch for the chasing dolphin, when it comes near the egg it will start spinning (it's confused by the gas?), point ecco at him and charge into it while it is spinning to hurt it, them turn around return to the egg, repeat until you have hit it a few times and you will exit the level. |
|
Level 29. Invasion (cutscene) |
|
Level 30. Chance of reckoning 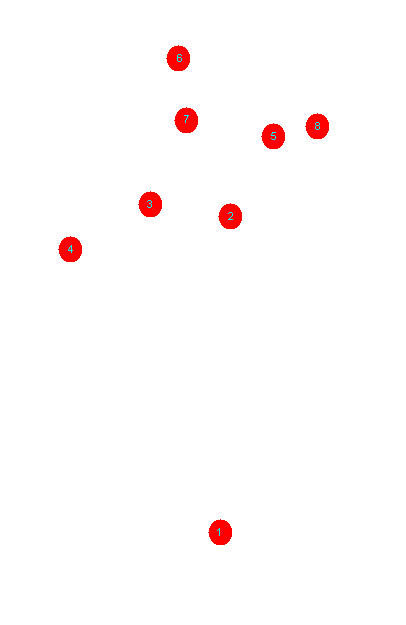
You start at (1), swim to (2) and push the nearby rock into the whirlpool to block it, do the same at (3) (you may want to grab the power of stealth at (4) so the enemies don't attack you). Get the power of sonar at (5), be careful of the bat like creature near it though, use the power of sonar to destroy the rock that blocks the gap in the ring around the whirlpool at (6), push the rock into the whirlpool to block it. With all three whirlpools blocked the water level will rise to the point where you can see the foe queen's head, you need to hit both her eyes and the thing (her backbone) that looks similar to her eyes on the back of head with the power of sonar once and then charge into them. After destroying both eyes and the backbone you will see a cutscene with rocks moving, swim to (8) and done into the dark area to exit the level. |
|
Level 31. Hatchery 
You start at (1), swim to either of the (2)s and watch the 'switch' in the wall, when it glows for a second hit it with your sonar and you will hear a sound, the shield protecting the robot at (3) will turn off for a few seconds, charge into it to damage it (you will need to be fast), repeat this three times to destroy it, after destroying the robot you will be able to exit the level through the tube the eggs entered the level through (5). Air and fish are (4) behind a forcefield, the robot turns it off every now and again when it gets a fish out, you will have to enter the area when the shield is off to get air and health. |
|
Level 32. Seeds of poison 
You start at (1), swim over and get the power of sonar (3), swim up the tube above (1) and keep going up until you are blocked by an egg blocking the hole, use the power of sonar to destroy it, you will be attacked by a vortex lava, swim back down to the bottom to avoid it, repeat this until you get shown a cutscene and exit the level. Air can be got by swimming down into the crater at the bottom at (1) or at (4), fish can be found at (2) or near (1). |
|
Level 33. Transfiguration You start at (1), swim to (2), you will be attacked by bat like creatures in the tunnel do your best to avoid them, at (2) get the power of sonar, go back and use the power of sonar to kill all the bats (there is air just before the power of sonar), get the power of sonar again and swim down to (3), use the power of sonar on the rock you will find to get another power of sonar. Get the power of sonar and swim up the small hole in the rock at (4) with the bat like creature, kill the bat and destroy all the rocks, in one of the rocks is the power or morphing, touch it so you are glowing and swim down to the bottom, find the fish that is swimming around and touch it, once you are turned into a fish swim up to (5) and enter the vortex queen's chest at the red hole to exit the level. While you are a fish you will come under attack from creatures that launch homing missiles at you, use the power of sonar on them before you morph to disable them for a short time so you can get to the red hole without being hit. |
|
Level 34. Heart of the foe 
You are in a round chamber with the foe queen's heart in the middle, around the sides there are small tubes that launch small enemies that float slowly down, the bottom has a harmful liquid that is slowly rising. What you need to do is get below one of the tubes that the enemies are coming out of and use your sonar to push them into the heart, as soon as one of the enemys hits the heart it will stop pumping for a second, charge into it while it is still to damage it (you will hear it going slightly faster if successful), repeat this until the heart drops off and exit the level and win the game. |
|
Return to Main Walkthroughs Page |
| Back to main page |