|
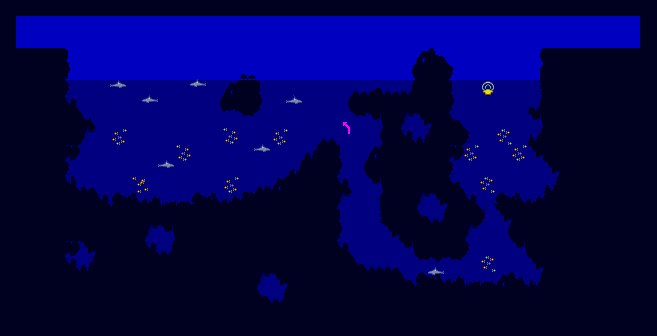
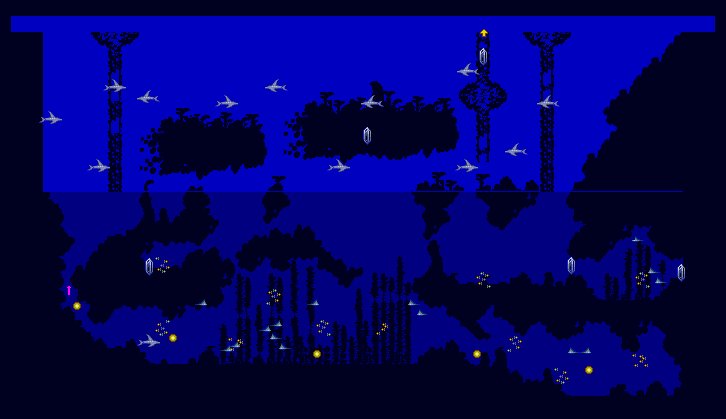
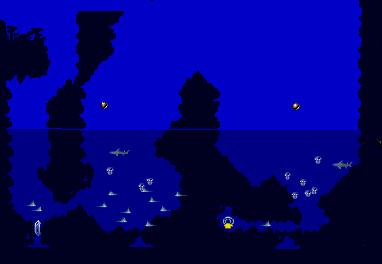
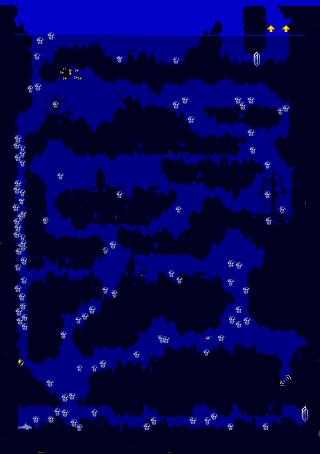
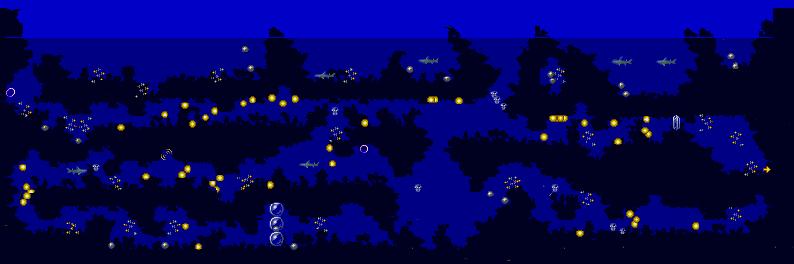
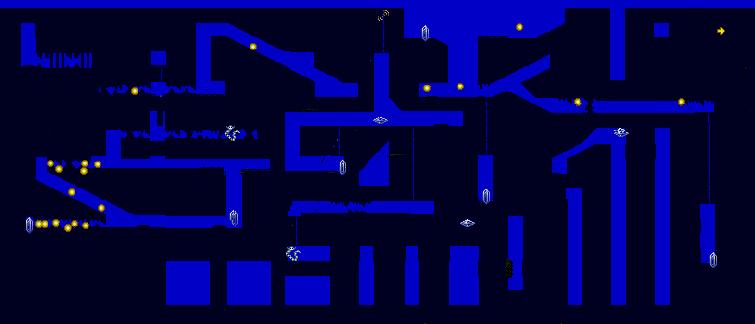
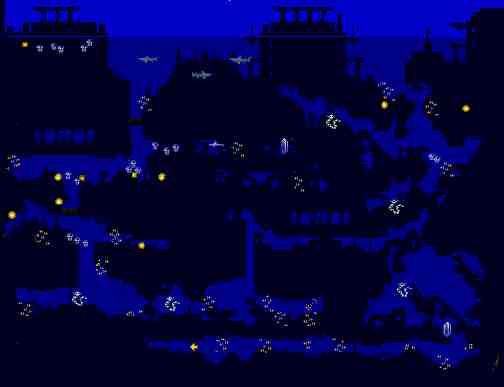
Level 1 : Home Bay
Sonar Map of level made by Friecco
Swim up slightly and then to the right, when you reach the current swim down against it. Once you get to the bottom of the current swim right, talk to the dolphin in the way, then continue right and swim up. Swim over the three circles near the surface to enter the 3-D stage. |
|
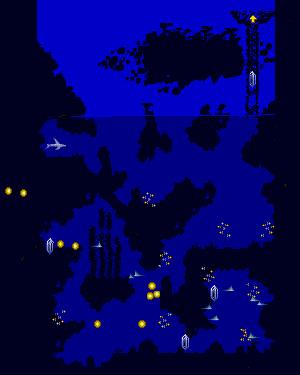
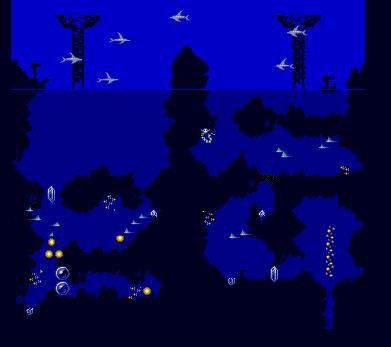
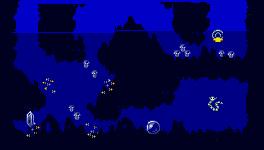
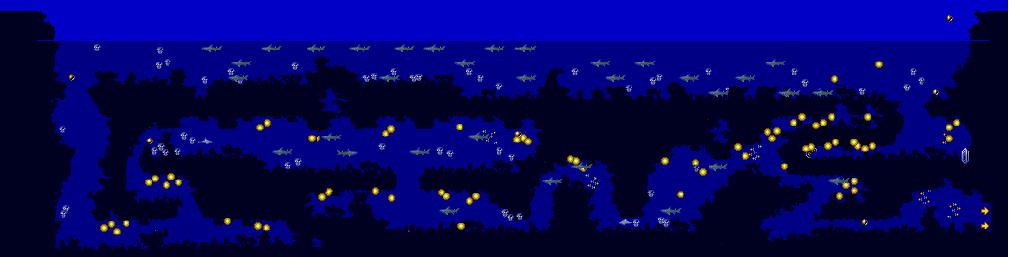
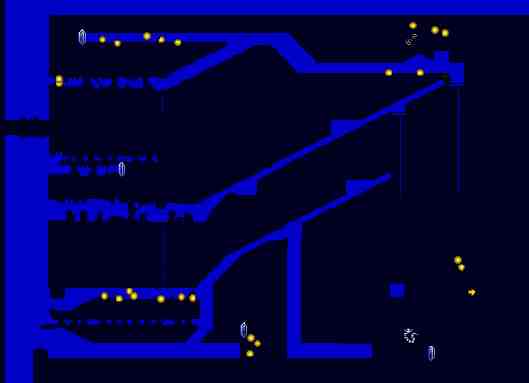
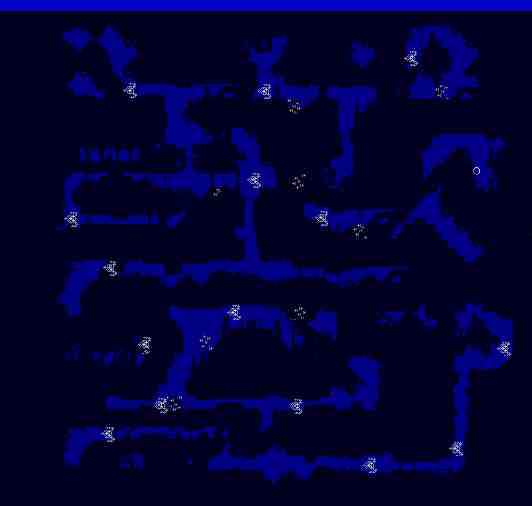
Level 2 : Crystal Springs
Sonar Map of level on normal difficulty.
You have to collect 3 (or 4 if your are playing on hard) glyphs that are placed at the corners of the level and take them to the lower left hand side of the level. Each glyph needs to be rocked backwards and forwards with your sonar untill it breaks away from it's position. I would suggest placing Ecco so he is over the position of the glyph facing left or right, fire a one pulse of sonar, the glyph will moveforwards and then back and then as it comes forward again hit it with your sonar again as it passes you, repeat this procedure. Each time it passes you it should move faster until it breaks free, as soon as it does use your sonar to push it to the lower lefthand corner, it will lock into place and start orbiting the glowing spot. (don't go away until it does or it will reset back to it's original position.). Repeat untill you have brought all the glyphs there. They should combine to produce a single glyph that will give you a 'song to shatter the stone' which means you can now use your sonar to break throught the rocks at the lower right of the level and exit the level. |
|
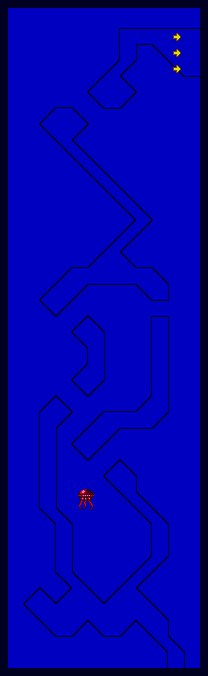
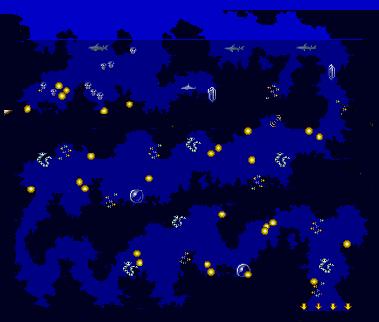
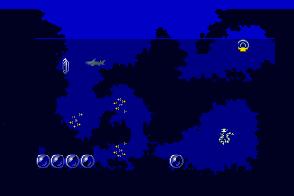
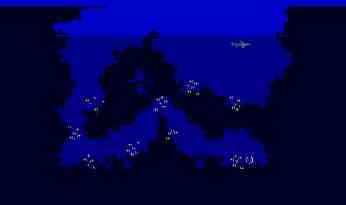
Level 3 : Fault Zone
Sonar Map of level made by Friecco
Swim to the right, then down (don't let yourself get sucked by the current into the right chamber) then swim left. You will see a rock fall from the roof, push it along to the left, it will destroy the rock barrier when it comes into contact with it. Now swim down and then to the right (if you are playing on hard, you will need to push the rock along with you to pass a second rock barrier.) After you travel right for a while a rock fall will start and your air meter will reappear, quickly continue to the right, swim up, left, up and then to the right again. Talk to the dolphin in front of you, then swim to the right to exit the level. |
|
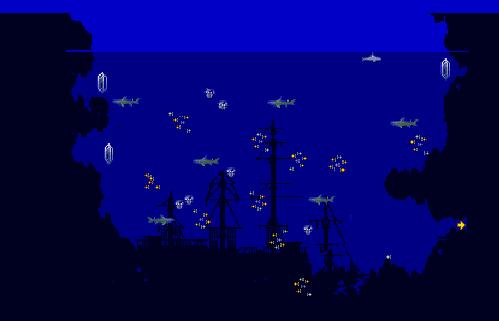
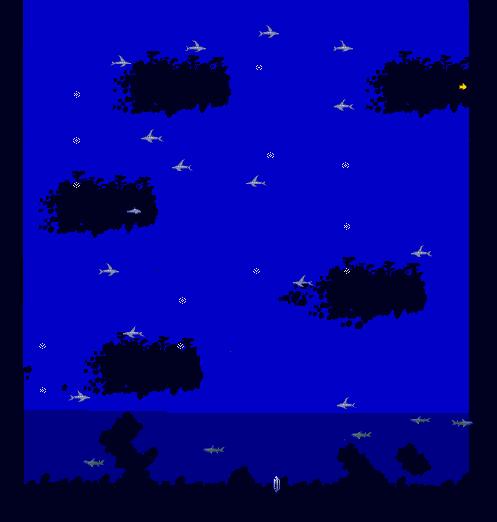
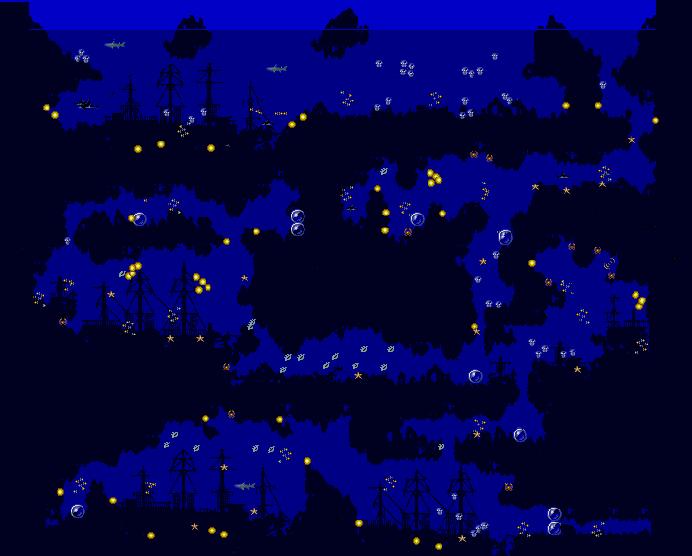
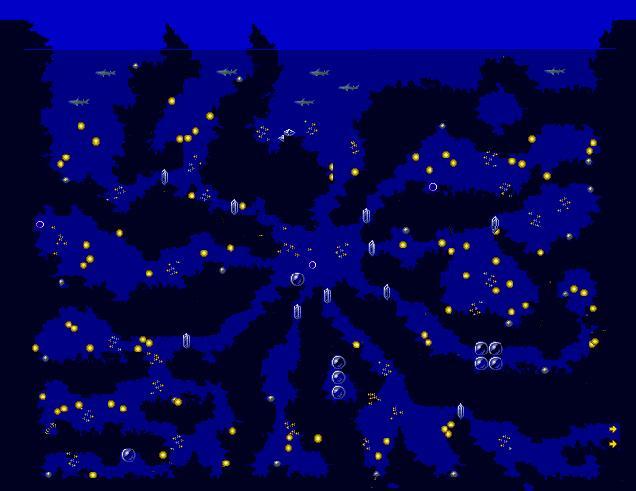
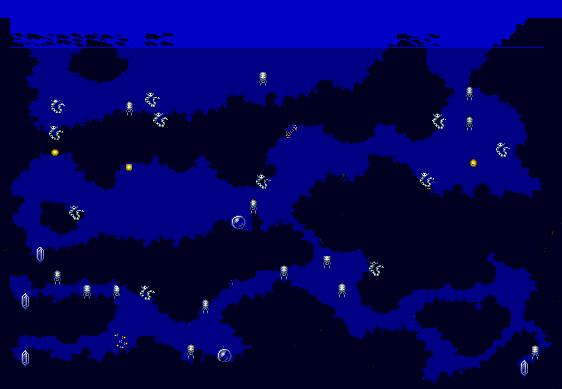
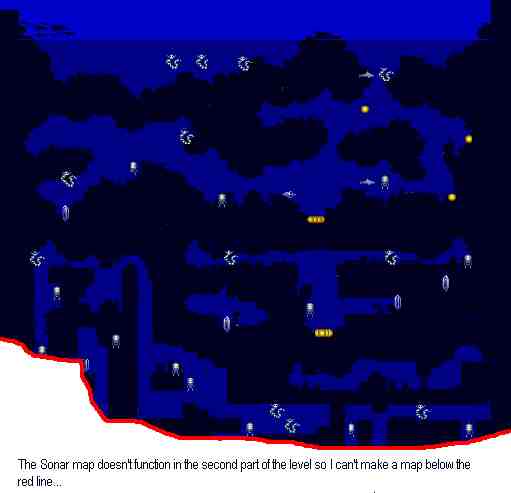
Level 4 : Two Tides
Sonar Map of level on normal difficulty.
Swim down and to the right through the gap between the rocks, swim to the left and down to find a pulsa. Swim back up and to the right, swim down slightly, past the shipwrecke you will find a passage going down, swim down it, then swim left, get the keysong from the glyph and retrace your path untill you get to the shipwreck again. Swim to the left, then down use the keysong to pass the barrier glyph, swim to the right and you will get sucked along by the current and end up by the key glyph again, get another keysong and return to the chamber just past where the barrier glyph used to be. Nudge the turtle when it is above the vertical shaft with the current coming out of it and it will retreat into it's shell and you can swim down behind it against the current as it falls. When you get to the bottom swim right, use the keysong to pass the barrier glyph and continue to swim right to exit the level. |
|
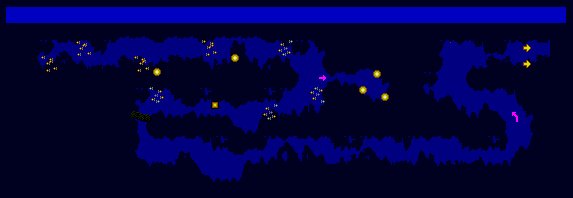
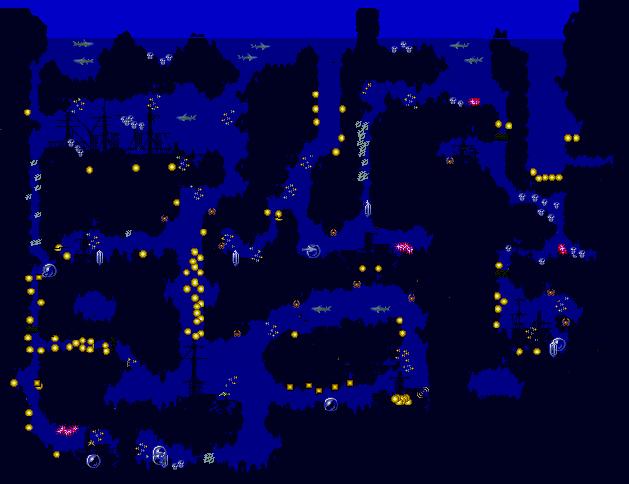
Level 4b : Trellas Bay (The section of level the "Two Tides" after you get taken to the future)
Sonar Map of level made by Friecco
Swim left and then up to get to the surface. Swim along the surface as far right as you can go (you will need to jump over some islands). Swim up the water tube as far as you can go dart out to the side into the water tube to the left and from their dart left to drop into a floating bowl of water. Hit the glyph in it with your sonar to make it suck in rocks, jump out of the left side of the bowl, swim down and to the left, an area that was previously blocked by rocks will now be open, go into it and hit the glyph with your sonar, a glyph to the right will now be passable for a short time, swim as fast as possible to the right (jumping over several islands) when you get to the far side of the level swim down and then right. Enter the area behind the broken glyph and get a keysond from the glyph at the back of the chamber and quickly get out before the broken glyph comes back together. Swim up the water tube above you, jump to the one to the left of it when you are as high as you can go. Swim up the second water tube, use the keysong to pass the barrier glyph and exit the level. |
|
Level 5 : Skyway
Sonar Map of level on normal difficulty.
Swim up/left and get a keysong from the glyph. Swim down and left, use the keysong to pass the barrier glyph. Swim as far left as you can, then swim up, let the current pull you up. Swim left and get a keysong from the glyph, when swim right, down slightly, right, then up to the surface. Swim up the water tube, use the keysong to pass the glyph, keep swimming up to finish the level. |
|
Level 6 : Sky Tides
Swim up to the top of the screen as soon as the level starts, as soon as the water starts to split dart to the far right side of the screen. Keep yourself at the top of the screen, when the gap on the left passes quickly 'jump' accross to the left side. Again Keep yourself at the top of the screen, when the gap on the right passes quickly 'jump' accross to the right side. When the 'tubes' turn diagonally right stay in the same (the right one) one and keep in about the middle of it. When the tube merges into the top one quickly swim up into it so you don't get dropped out. When the tube levels out and starts going horizontally again, swim along just below the top of the tube to miss the hole the tube, continue swimming along straight and you should miss all the other holes, if you are playing on easy or normal difficulty this is the end of the level. If you are playing on hard you will need to dart forward to safely pass over the gap in the tube. When the tube starts going up, keep to the left side, then follow the tube, when you reach the section that has 'holes' in it, point ecco up and dart up to pass out of the top of the tube untill you pass them, use the same method to pass the gap, when the tube starts going up keep to the right hand side to miss the hole and exit the level. |
|
Level 7 : Tube of Medusa
Sonar Map of level made by Friecco
This level is similar to Sky Tides but the screen doesn't move around the screen by itself, if you fall off the bottom of the screen you get sent back to the level Skyway and you can use your sonar map. When you start the level swim up and then to the left and then up. When you start to swim up you will encounter a floating medusa you will need to swim past it very fast or it will grab you the throw you down. Swim out of the top of the tube to jump to the one above it, continue to swim up fast and jump out of the top of the next section to the next section of water. In the next section swim up/right quickly and then turn and swim up/left. Then turn back to the right and jump to the next section, swim up and slightly to the right to exit the level. |
|
Level 8 : Aqua Tubeway (Only present if you are playing on hard)
This is basically Sky Tides but harder and it only is playable if you are playing on hard difficulty. For the first section while you are going right keep to the top of the tube and you should miss all the 'holes'. When the level starts going down swim to the left as soon as possible and then up slightly jump straight up to pass over the 'hole' and then jump to tube to the left when you go down and to the left. Drop down and to the left to get to the lower pipe, swim left at trhe bottom and when you go up move left to mis the 'hole', jump back to the right to get back to the pipe you were in before. Follow the tube down when you get to the cross over of two pipes swim left against the current as hard as you can, you should burst through the pipe and land in it lower down, quickly point ecco up or you'll fall out the bottom. Swim up and past the crossover again, this time go right, dodge the hole and continue to follow the pipe through the up and down sections. Drop down at the end of the pipe to enter the pipe below it and exit the levels. |
|
Level 9 : Skylands
Sonar Map of level on normal difficulty.
This is a normal level but there are bubbles present in the sky that if hit with your sonar bounce you up. When the level starts swim as far to the left as possible, then swim to the bottom, position ecco slightly out from the far left of the level, swim straight up as fast as possible when you burst out of the water start firing your sonar as fast as possible, provided you are in the right place you should be pushed up and to the right to land in a floating pond. The next lot of bubbles is at the right side of the pond, you need repeat the procedure you performed with the last lot of bubbles but you MUST hit the bubbles with you sonar when you are above the bubbles if you hit them from below you will be thrown the wrong way, if you make it you will land in another floating pond. The next lot of bubbles is to the left of the pond you can use the same method as the first lot of bubbles, you won't probally won't manage to reach the last group of bubbles but this doesn't matter you should be cought by one of the flying future dolphins, when you get caught by the dolphin press and hold up while constantly pressing c this will stop you from being dropped, drop off (press down+c) into the floating pond (where you would have landed if you got the last group of bubbles) as soon as you pass over it. Use the bubbles above the pond to get up to the next pond, the next pond hasn't got any bubbles above it instead you need to let one of the flying dolphins carry you to the right to the next pond, when you get there drop off and swim right to exit the level. |
|
Level 10 : Fin to Feather
Sonar Map of level on normal difficulty.
This level is the first appearance of the Metasphere of the game. You start the level in a floating pond in the sky, jump out the right side and let your self drop down to sea level then swim to the right. As soon as pass throught the gap between the rocks swim up fast so you jump out of the water, you will see a dark sphere floating above you, you need to collide with it when jumping out of the water. Once you collide with the metasphere you will turn into a bird (seagull?). The controls for the seagull are similar to the controls for ecco except you have no sonar, hold down c to move faster, press b+down to dive downwards (you can use it to destroy rocks!). If you come into contact with water you will be turned back into a dolphin, you need to fly over the rock ridge and hit the water on the other side, to avoid the eagles I find it is best to fly to the right and then fly up while staying in as far right as possible, when you get to the top an eagle will dive in from the left it should miss you, quickly move over to the left a second eagle will attack from the right, as soon as it passes you turn and fly to the right while staying at the same height, you should get past the top safely, you then just need to hit the water on this side of the ridge. Once you are ecco again, swim to the right, down and then left into the passage at the bottom of the level, the entrance to the 3d stage is at the end of the passage. |
|
Level 11 : Eagle's Bay
Sonar Map of level on normal difficulty.
Swim left as far as you can then up/right slightly to reach the surface. Swim right as far as you can go (go will need to jump over one island on the way), jump out of the water and hit the metasphere floating above the water. Once you are a seagull you need to fly to the left and up over the rock ridge and down into the pond on the other side of the ridge (I would suggest flying up until you are just above the line of white cloud and then flying straight until you pass over the ridge). Once you are ecco again swim down and get a key song from the glyph, then swim up and use the metasphere floating above the surface of the water to become a bird again. Fly across to the right side of the level and land in the pond to the right of the rock ridge where you found the first metasphere (I would suggest you fly just above the line of white cloud again until you reach the ridge then fly up and over keeping as close to the rock as possible). Once you land in the water swim to the left of the area and use the keysong to pass the barrier glyph and then swim into the passage below it to exit the level. |
|
Level 12 : Asterites's Cave
Sonar Map of level on normal difficulty.
Swim left, up and then to the right then is th top of a broken glyph at the end of the passage, use your sonar to push it back to the left and then down until it joins with the lower half. Get a keysong from the glyph and swim up and use it to pass the barrier glyph. Swim up the water tube in the midle of the surface of the water, when you get to the top swim fast to the right and you should pop out of the tube and get caught by future dolphin. Once you pass over the rock ridge drop down and swim down the passage on the left of the pond. When you enter the cavern below the passage you will see a worm to your left, swim slowly to the right and down letting it follow you. There is a pasage going down that is blocked by rocks, contact with the worm will destroy them you will either need to swim very close to the rocks to the following worm touches them or use your sonar to push the worm into the rocks. Once you have cleared the passage swim down their is the top half of a broken glyph below you push it up and then left and down until it joins with the bottom half on the sea floor. Get a keysong from the completed glyph and then swim to the right and use the keysong to pass the barrier glyph. The chamber on the other side has the asterite in it, talk to the asterite then swim up above the asterite, swim down the center of the asterite following a space created down it by it's rotation if you come to close to any of it's globes you will be pushed out and will have to start again. Once you get to the bottom you will see a metasphere touch it to start a time warp which takes you to the next level. |
|
Level 13 : The Lost Orcas
Sonar Map of level on normal difficulty.
This level is does not have it's name/password screen shown when you start it so it is more like Asterites's Cave part 2. When you start the level you will be just below and to the right of an orca renember it's position you will need to return to it several times. Swim down and then to the right along the sea floor, you will find two baby orcas along the way swim just in front of each them so them follow you then lead them back to the orca at the start of the level. After they swim away and stay with the orca swim back to the right and jump over the rock wall at the end so you land in the water on the other side. Swim down, right and down then left, if you are playing on easy/medium difficulty levels you should find a baby orca here (get it to follow you) if you are playing on difficult there won't be. Swim left as far as you can go, up slightly, left and down, there is another baby orca down here, take it back to the orca at the start of the level. If you are playing on the hard difficulty level there are more baby orcas present in the level you will have to go and find, there is one or two in most major caverns but you will have to locate them yourself. Once you have all the baby orcas back to the start of the level the orca should thank you for your help. Once the orca does this one of the baby orcas will swim off to the right you need to follow it, keeping it in or close to your field of vision if you stay close it will take you to the exit. If you get too far away from the baby orca it will return to the start of the level and you will have to start again. |
|
Level 14 : Maze of Stone (Only present if you are playing on hard)
Sonar Map of level.
Swim as far left as you can (you need to jump over a few islands) then swim down the narrow shaft against the current, once you get out of the current continue to swim down the shaft below it, there are spiked shells moving backwards and forwards accross the passage you will need to advoid them or they will crush you. Once you pass the shells you will see rising bubbles in an alcove to the right there is rock there push it to the left so it falls down, follow it down the shaft. It will break through a barrier of rocks, swim down as far as you can go past the rocks and then to the right for a short distance, you will see a ring of stars, use your sonar to push it left and back up the shaft, then when you reach the passage with the current coming out of it push it right into the passage. The ring of stars will destroy the rocks blocking the end of the passage. Once you pass the barrier of rocks leave the ring of stars and swim down slightly and then right as far as you can, there is a pulse in the chamber on the right side, swim back to the left to the hole with the current coming out of it, use the turtle swimming above the hole to get down against the current, when you get to the bottom of the hole swim left, charge to get past the shell barrier, hit the glyph with your sonar to make it suck in rocks. Swim back out of the chamber and let the current pull you up, swim left slightly and then up into the passage with lots of spiked puffer fish, swim left at the first opperunity and hit the glyph at the end of the passage with your sonar, swim back to the shaft with the spiked fish and continue to swim up until you reach the surface. Swim right and then down, go down the left passage and get a keysong then swim back up and go down the right passage, swim right and then up, use your keysong to get rid of the barrier glyph, turn around and get another key song then return to this chamber, swim right as far as possible, you should find a ring of stars push it left and up the passage where the barrier glyph was, once you get to the top swim right. There is another ring of stars on the sea floor push it right and then down the vertical shaft with current coming out of it, it will break through a barrier of rocks, don't stop pushing the ring of stars you still need to push it down, right and down to pass another barrier of rocks (the ring of stars has a time limit of how long it lasts so you will need to be fast). Once you pass the second rock barrier swim down right and you should find yet another ring of stars, push it left and then down to pass through a rock barrier, swim right/down and hit the glyph with your sonar, then swim back to the surface. Once you are at the surface swim right and jump over the rocks, you will see a rock falling on the left side of the pond swim down behind it to pass the current, when you get to the bottom swim quickly right and use your keysong to pass the barrier glyph and continue right to exit the level. |
|
Level 15 : Four Islands
When you start the level swim down as far as you can go, there is a small vent with a current coming out of it to the left, swim down into it against the current when you get to the bottom swim right (Note# there is a pulse in the left passage) talk to the dolphin in the cavern. The dolphin will swim off you need to follow the dolphin closely or the dolphin will return to this cavern and you will have to start again. You will probally need several practice attempts before you make it. Once the dolphin stops at the rock barrier on the other side of the level, talk to it again and it will give you a song to shatter the stone. Use your sonar to break through the rock barriers and swim downwards. once you pass the section with the falling spiked shells you have two choices. You can swim down and use the turtle to get into the shaft with the current to the left, a dolphin is down there that will take you to the exit, or since the exit is only hidden in a secret passage to the right that isn't blocked you can just swim to it. To get to the exit simply swim right, you will pass through a thin passage with spikes on each side, once you get through it simply swim into the wall to the right (it isn't solid) to exit the level. |
|
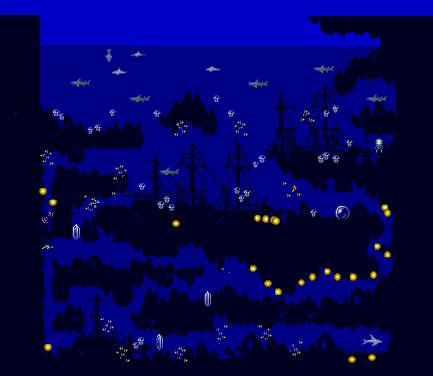
Level 16 : Sea of Darkness
Sonar Map of level by Friecco.
This level is as the name suggests dark, you will only be able to see the outlines of most things most of the time, bu if you fire a pulse of sonar the level lights up for a few seconds so if you use your sonar every few seconds you should be able to play through this level like any other level. When the level starts swim left/up staying very close to the left rock wall, at the first opening swim down and get a key song from the glyph at the bottom of the passage. Swim back out and then to the right, on the right side of the cavern there is a passage blocked by a barrier glyph use the keysong to pass the barrier glyph and swim into the passage. Swim up then right as far as you can go, then swim down and get a keysong from the glyph at the bottom of the passage at the far right side of the level. Swim back up and to the left as far as the area just past the first barrier glyph, swim down and use the keysong to pass the barrier glyph at the bottom of the cavern. There is a ring of stars to the left, push it with your sonar to the right, at the end of the passage you will need to push it up/right at an angle to make it break through a rock barrier, there is a baby orca behind the barrier. Get the baby orca to follow you, swim left, there is hole in the roof of the passage with a current pulling up into it, let yourself get sucked up into it, once you are out of the passage swim right, the mother orca will talk with you, after she finishes swim right to exit the level. |
|
Level 17 : Vents of Medusa
Sonar Map of level on normal difficulty.
When the level starts you will be on the lower left of the map, swim straight to the right untill you reach the right side of the map, in the lower right corner there is a key glyph in a room with a current going up, swim in and get the keysong and quickly swim back out (the current reduces the air meter while you are in it), swim left, and up at the first opening going up (it is back near the left side of the level) then swim left and hit the metasphere before you run out of air. You will be turned into a jellyfish, the jellyfish's controls are as follows, B=move up quickly, C=move up slower (to move down don't press anything and you will start to sink). Swim up the shaft above you, the jellyfish can't hurt you now but you will have to get past two dolphins blocking the way, the first dolphin can be got rid of if you swim right slightly so you hit it from below. The second dolphin is behind a rock wall so you will just have to swim past and try not to get hit by it's sonar. Once you get to the top of the shaft, swim right slightly and then swim up to get to the surface, once you reach the surface you will be turned back into a dolphin, swim right as far as you can (you need to jump over one rock barrier) once you pass the rock barrier use the keysong to pass the barrier glyph, swim right and then up to exit the level. |
|
Level 18 : Gateway
Sonar Map First Part Sonar Map Second Part, (normal difficulty)
You start the level falling from the sky, swim down and below you there is a glyph that says "Find the magic arm" when you hit it with your sonar. Swim right (this step is optional but it gives you a useful ability) and you will find a silver creature (the magic arm), do a sonar charge into it (hit charge then quickly hit the sonar button to hit it with your sonar) it's arm will pull back to it's head and spin around before spreading out again, when it gets the whole way out it will spit out a mass of bubbles, swim into them, repeat this process untill the magic arm destroys itself. Swim back to the orginal glyph you saw at the begining of the level talk to it again and you will find it's message has changed to "you now have the hunger song. Use it in the open ocean with charge...", what this basically means is that now when you enter one of the 3D stages if you press charge and sonar together a burst of homing bubbles is shot out that destroys enemies, but you only get a limited supply of them depending on how many of the 'magic' bubbles you caught from the arm. Swim up and to the right, jump over the rock barrier and enter the 3D stage on the other side. After the 3d stage you will arrive in another pool, jump over the rocks to the right and then swim down and too the right, you will see a lone fish, use your sonar to push it to the right untill you get to a dolphin who will eat it, this will then allow you to access the glyph behind the dolphin and get the keysong. Swim back to the surface and jump over the high rocks to the right, continue swimming right and then down, use the keysong to pass the barrier glyph. Continue to swim down, and then to the left, there is a pulsar at the top of the passage. Continue swimming left, swim down using the rock to pass the current, right and use the next falling rock to pass this current. Swim right some more and then down to exit the level. |
|
Level 19 : Moray Abyss
This level starts in a canyon in which you slowly decend at a fixed rate, your air meter does not decrease as you go down, there is a giant shell in te center of the canyon that slowly moves around. You should stay at the top of the screan at all times, start by swimming to the right side of the screen, stay flat against that wall, you see every now and again a moray eel stick his head out of the giant shell, a few seconds afterwards the shell will more and hit the canyon wall below you (but will miss you, provided you keep to the top of the screen like I said to) a moray eel will then swim down the opposite side of the canyon to the side you are on, so you will be safe from it since it is on the opposite side to you. As you get further down you will see a moray eel's head on the left wall, it will snake out and miss you since you are on the opposite side to it, use your sonar to destroy it (you can just use normal sonar, sonar charges are not required), Swim over to the side it was on, this sequence of the giant shell hitting the wall and the moray eel's on the walls and swoping sides should be repeated for a long while. Eventually you will reach the bottom of the canyon, the giant shell will bounce a few times as it hits the bottom, the eel inside will then try to attack you, simply hit it quickly with a lot of sonar charges to kill it, the shell will shoot out two of the Asterite's globes and you will see the message "Find.... .....Globes". Swim up (you can now move around freely) and you will find a teleport ring at the 'top' of the canyon (you can only go up a certain distance...). Enter the teleport ring and you will be sent to a bay (your air meter WILL descrease now you're left the canyon). Swim straight left and you will find a globe, hit it with your sonar to get it to follow you, the swim down and pick up a second globe (Notes about the globes; You can only carry two globes at once, if you only have one globe it will fall off after a period), return to the teleport ring with the globes and take the globes to the bottom of the canyon, you'll get another message, return via the teleport ring to the bay and swim left then down then right, you should now be able to pass the barrier glyph by hitting with your sonar. swim right to find one globe, swim up/right to find a second globe, return these globes to the canyon, then return to a point just below where you found the second globe and use your sonar to pass the barrier glyph and exit the level. |
|
Level 20 : The Eye
Sonar Map of level on normal difficulty.
You start this level just below a teleport ring, swim down to find a globe, swim right along the sea floor to find a second, take them to the teleport ring and the Asterite and then return to where you found the second globe and swim on. You will arrive to a large open area at this point if you are playing on easy or hard you will see another teleport ring. you are now in a cental area with several passages leading off it each one blocked by barrier glyphs, What you need to do in this level in short is take 2 globes to the asterite which then allows you to pass another barrier glyph, you then retrieve the globes behind it and etc, etc. To start taking back the two initual globes means you can now pass the barrier glyph in the lower left passage (right below the passage you entered the chamber by), once you pass the glyph swim left to find the first globe, then swim right and down, then left at this point you can find a pulsar on the sea floor, swim right, down and left again to find the second globe, return to a teleport ring with them. You can now access the top left passage in the main chamber, Swim left and up to find the first globe, the right/up to find the second, return them to the Asterite. You can now access the bottom passage to the right of the air bubbles, simply swim down to find the first and second globes, return them. You can now access the next passage to the right of the last one, swim down to find the first globe then swim up and right then down to find the second, return them. Now return to the top left passage you have already visited, swim left along the sea floor and you will find another barrier glyph inside the chamber, you can now pass it, swim left for the first globe then up/right for the second one, return them. You can now access the upper right passage, swim up/right for the first globe, then right for the second globe, return them. You can now access the middle right passage, swim right for the first globe then down/right for the second, return them. You can now access the bottom right passage, just follow the passage for the two globes, return them. Swim back into the middle right passage, swim right, you can now pass the barrier glyph at the back of the cave, swim down/right for the first globe and then up/right for the second, return them. Swim down the second passage to the right of the air bubbles in the main chamber, swim right/down you can now pass the glyph to the right, swim right to exit the level. |
|
Level 21 : Big Water
Sonar Map of level on normal difficulty.
Swim left along the sea floor for a globe, then swim as fast as you can across the open area filled with whales, then you get to the other side you will see at the top the second globe sealed behind rocks, talk to the whale directly to the right of the rocks and he will break them for you, get the second globe, then swim down/left to the teleport ring and return them to the asterite, then swim left pass the barrier glyph and continue left to exit the level. |
|
Level 22 : Deep Ridge
Sonar Map of level on normal difficulty.
This level is similar to 'The Eye' in that you have to collect a large number of the Asterites globes but unlike the eye the globes are not behind barrier glyphs and can be gathered in any order. You start the level at the upper left hand side near a teleport ring, from there swim up to the surface and then swim along to the first lot of rocks blocking your way, swim down to find the first pair of globes, return them. Return to the place you found the first pair, jump over the rocks and swim right untill your way is blocked again by rocks, swim down for the second pair of globes, return them. Return to the place the second pair of globes were and jump over the rocks, swim right and jump over the next lot of rocks, swim down straight after the rocks, there is a section of rock you can swim through, the third pair of globes are below there, return them. Swim just beyond the opening to where the third pair was to find the 4th pair. Swim past the place the 4th pair was and jump over the rocks to get the 5th pair, this is the last pair on the surface, return to the teleport ring you started the level next to. Swim right along the bottom of the passage to find the 6th pair. Continue swimming right past were the 6th pair was untill you reach a jellyfish (renember this jellyfish, I'm going to use it as a refrence point for directions later in the walkthrough), then swim down and back to left. There is a pulsar in the roof part way through the passage, continue left then swim down and back right, you will find the 7th and 8th pairs of globes here (note you can swim through the rock wall at the end of the passage to exit from the passage faster if you want, there is also a second teleport ring below and to the right of the jellyfish on eay and normal difficulties). From the jellyfish swim down and then right, and down/right slightly to find the 9th pair of globes. You should now have all the globes on the level returned, go to the jellyfish and swim right from it, keep swimming left (be careful keep on a path that keeps you going almost straight right, you should be able to pass the barrier glygh (if not check you have not missed any globes) and swim right and then down to exit the level. |
|
Level 23 : The Hungry Ones
Sonar Map of level on normal difficulty.
As sonn as you start the level swim straight left into the passage with falling shells to get a pulsar, then swim back right out of the passage and up to the surface. You now must travel to the far left side of the level, you can either just swim as a dolphin or there is a metasphere you can use to turn into a shark (a quite note about being a shark, your air meter deceases if you stay still so always keep moving and your air meter will remain full), or there is a metaspere in the air that can be used to turn into a bird. Choose a method (I would recomend that shark as being easiest), and go to the far left of the surface, then swim down (if you are a shark there will be a metasphere here to demorph you). When you reach the bottom swim right, you will reach a barrier of rocks charge them to get past, swim up, left and up again. There is another shark metaspere here, use it. Swim right alone the bottom of the cavern untill you reach a opening with bubbles coming out of it, swim down into it (you will need to swim backwards and forwards to decend as sharks can't swim straight down). Swim right at the bottom, and then up, then right and then down, then right (be careful of the dolphin firing sonar). Swim right along the bottom of the cavern, then down and back left and then back right again, you will hit a metasphere and return to being a dolphin, swim right to exit the level. |
|
Level 24 : Secret Cave
Sonar Map of level on normal difficulty.
This level is very similar to "Gateway", after you start the level, swim down then right, then down and then right again. To find the 'magic arm' (see the instructions from the walkthrough for Gateway if you are unsure what to do here), then swim back to the surface and then jump over the rocks to the right, swim down, then right and then up to enter a 3D stage. This 3D stage is filled with sharks, either use the hunter song from the magic arm or charge constantly to survive the sharks, after you pass the 3D stage you go to the next level... |
|
Level 25 : lunar Bay
Sonar Map First Part Sonar Map Second Part, (normal difficulty)
In this level you will encounter Vortex Drones, they do not kill you but if you let them near you they will drag you off the screen to another mini level which you must play morphed into a vortex drone to return to the level so be careful, use sonar charges on them when they get near you... As soon as you start the level swim right, jump over the rocks in the way, then swim down. Swim left along the sea floor untill you reach a glyph, hit it with your sonar and it will such in spiked globes, swim back right along the sea floor and swim down the first passage you find (it was previously blocked by the spiked globes). As soon as you fet through the passage swim left and into the passage going that way, swim down/left then up/left and then left, there is a glyph at the end of the passage, hit it with your sonar to become invincible for a short time (you get surrounded by stars), then swim right, down and left, hit the glyph with your sonar to suck in more spiked globes, swim back right and then up/right, then swim down and then right following the sea floor, swim down into the first passage, then right, then down again and you will be grabbed by a pair of vortex drones and taken into a time warp. You will arrive in the dark future, you will notice you have a new round status icon on your screen, this indicates the way gravity is going ourside the water, if the ball is up then you will go up rather than falling when you are outside the water. Anyway swim up/right to exit the pool and slide along the passage, you will meet your first 'blob' enemies here, they can easilly be destroyed by sonar. When you get to a pipe going down go down it, then swim left, slide back right along the slope and then go left and get a keysong from the glyph at the end of the passage. Then swim right as far as you can go, you will encounter your first 'anti-gravity' spot here, once you get to the end you will be thrown upwards (watch your ball in the round meter rise as you get near the area), once you get to the top continue right, Swim up the pipe (hit the swim fast button to make ecco wriggle about enough to get up there), swim left, let your self get pulled up by the anti-gravity and go right at the top, slide down the slope right, half way down jump up into the pipe going right above the slope, swim right, provided you have the keysong you can use your sonar to destroy the blocks in the way, if you manage to jump into the top pipe there is a pulsar at the top, drop down the passage below the junction of the three pipes, there is a milestone glyph at the bottom, hit it with your sonar to make it change shape and save your progress, swim left, down the pipe and get the keysong, swim left and get throw up by the anti-gravity, go right and jump over the milestone glyph, continue right, swim down the pipe at the bottom you will find the way blocked by blocks which you can't destroy, but if you look to the right/down there is large ball, if you hit the ball with your sonar it moves towards you and if the ball touches the blocks it destroys them, use the ball to destroy the blocks so you can pass, but be careful not to get crushed by the block. Once you are past the blocks swim left and then down the pipe, then right and then into the pipe. Swim to the top of the pipe and then charge right to pass the gaps in the pipe without falling, keep going and after three jumps you will end up in a lower pipe with it's end blocked by blocks, use the ball to the right to get past them, use the anti-gravity to fly up, swim right. Jump a gap in the pipe, swim right, you now at section of pipes that are each slightly higher, you need to jump up from on to the other going backwards and forwards to get to the top, this is quite hard and you will probally fall quite a few times, but there is no way other than practice and hard work to get it done... To make the jumps I would suggest that you position ecco about in the middle of the pipe and swim towards the end of the pipe and then point ecco upwards and charge. Once you get to the top, make the final jump left under the milestone glyph and slide left down the slope. Swim left, then drop down into the passage at the junction, use the anti-gravity to get into the upper pipe (well if you want you could just use a well timed charge instead), swim up, swim right and jump to the upper passage going right (DON'T let ecco fall down the lower one), swim right into the pipe. Use a keysong to destroy the blocks blocking the end of the passage, use the anti-gravity to get to the top right pipe, jump from there to the higher pipe to the left. Once you out of the pipe slide left as fast as you can and jump the gap to the other side, hit the glyph to suck in blocks, then swim back right and drop down the gap, swim right and jump up to the upper passage, swim right, use the anti-gravity to get to the top right passage and swim right past were there was a barrier before to exit the level. |
|
Level 26 : Black Clouds
Sonar Map of level on normal difficulty.
Swim right and up at the second pipe going up, when you get to the top jump left down the slope and then quickly jump up to the higher passage, slide left and hit the glyph to suck in blocks. Slide back right and jump over the pipe you came up in and slide right down the other side of the slope. Continue to slide right and jump over the spiked balls, just before you drop down into the pipe jump up to get pulled by the anti-gravity into a chamber with a pulsar. Drop down te pipe and swim down untill you get to the ball at the bottom, hit the ball with your sonar and it will move towards you, use that to move the ball to the top of the pipe so that it sucks in the spiked balls blocking the left/down passage, jump into the now cleared passage. Drop into the first down pipe you come to and swim down, swim into the passage slopeing down to left, drop down to the bottom and quickly move right before you are thrown up by the anti-gravity, swim right and you will find a chamber with a glyph, hit it to suck in blocks. Swim back left and jump to be lifed by the anti-gravity, go into the left pipe, drop down and swim right before you are lifted by the anti-gravity, swim right and hit the glyph with your sonar to suck in more blocks. Swim back left and let yourself get lifted by the anti-gravity, go into the top left passage, let ecco get sucked up the pipe, when you get to the top jump to the pipe above it, and swim up, swim into the first passage to the left you see, slide left along it, when you get to the end carefully drop down so you land on the level below and don't fall the whole way down, slide right and hit the glyph with your sonar to suck in more globes, then swim left and drop down the side of the building but keep ecco close it to the building so that you land on a ledge further down and don't fall right off the building. Swim right and then go up the pipes untill you get back up to the pipe you started the level in, swim right and up the second pipe again, then slide down the right slope and continue right past the spiked balls, jump into the left/down passage, and swim down at the first pipe, swim down and swim into the second pipe to the right, swim right to exit the level. (if you encounted any barriers blocking you in these last pipes then you missed hitting one of the glyphs..) |
|
Level 27 : Gravitorbox
Sonar Map of level on normal difficulty.
Swim right, slide down the slope right, drop and go left at the fork, slide left, swim down and then swim right to get a pulsar, swim back to the york in the slope and slide right. Jump up into the upper right pipe (don't slide off the end of the slope!), swim right against the current and when down into the lower pipe. Swim to the bottom of the pipe and you will notice your ball in the gravity meter fly up, which shows anti-gravity below so you can swim out of the bottom of the pipe and not fall to you death. Swim out of the bottom of the pipe and move right a pipe, swim up, charge up into the current to get into the upper left pipe before the current sweeps you past it. You now need to preform the difficult task of jumping up from the top of the pipe to the passage above, once you do that slide left down the slope, slide left and let the anti-gravity lift you at the end, swim left into the pipe and get a keysong from a glyph at the end, swim back right and proceed to jump right up the slope, jump over the passage sloping down and continue up the one going up, jump left into the pipe going left, swim left, slide down the slope and jump to the pipe, use the keysong to pass the blocks at the end, fall and let the anti-gravity lift you up, go into the left pipe and swim left to exit the level. |
|
Level 28 : Globe Holder
Sonar Map of part 2 of the level on normal difficulty.
This level starts in a square room with a huge pink ball in the midle with two chains of small balls holding it to the top and bottom of the room. The last two of the Asterite's globes are inside and you need to get them out. If you use your sonar to slowly push the pink ball backwards and forwards you can get it to move faster and faster and if you get it moving fast enough the chains of balls holding it will break free from the floor/ceiling, but they will reatach if the globe holder drifts back near either of the points that the globr holder was attached to. Once you have the globe holder floating freely push it against the wall hard to damage it (it will change colour slightly), keep doing this untill it gets bright red and the two chains of small globes attached to the globe holder will explode (note- the globe holder repairs itself over time so you must keep hitting it against the wall constantly to get it bright red). Once the chains of small globes explode the globe holder will start moving about by itself and try to crush you into the wall, you must dodge it and wait for it to get red again (it turned back pink after the chains of small globes exploded). I would suggest that you charge rapidly around the outside of the room and every second time round change the direct you are going around in, but really it just takes practice to do. The thing you need to watch for is when the globeholder gets bright red and stops moving contact with it will kill you, so when you see it is almost red go and stay on the side of the room that the globe is not on so you don't accidentially kill yourself on it. Once the globe holder is stopped, simply hit it with your sonar to destroy it and reveal the globes, swim up to them to start a time warp. Once you arrive back in the present, swim left jump over the rocks and swim down, then right, use the teleport ring and take the final pair of globes to the Asterite, he will give you his powers and tell you to go fight the vortex, swim up to the teleport ring to exit to the next level (you don't actually see the password screen though for some odd reason unless you get taken by a vortex drone...) |
|
Level 29 : Dark Sea
Sonar Map of level on normal difficulty.
You have special powers from the Asterite now, yu have no air meter and your health slowly increases when you are heart... Anyway, Swim right, jump over the rocks, swim down, swim slightly left and then down again. Swim left along the sea floor untill you get to a glyph, hit it with your sonar to make it suck in globes, swim back right untill you get to the passage going down into the vortex structure, swim down into it. Swim down (you will encounter your first vortex here, don't let it touch you, hit it twice with your sonar to kill it), when you get down to the passage blocked by spiked balls swim right, there is a narrow passage below a much large one (it is backgrounded with vortex style things, you can't see the main background behind it) swim right along it, swim up in the chamber at the end and hit the glyph with your sonar to suck in spiked balls, return to the passage that was blocked by spiked balls earlier and swim down it (it is now clear). The screen will start scrolling by itself and you must swim with it or you will be crushed, along the way you will see glyphs that if you hit with your sonar will send out 'stars', if you see one of stars later and hit it with your sonar it will move the way you need to go, so they are a very handy hint... Anyway to start you need to go right, up, right, down, right, up, right and down for a longer distance. You then go left and down at the second passage going down, then right, up, left and past the passage you went down before, then you go down, left, down slightly, and continue left. Continue left to the end, then up and right/up, then left. You then swim up/left for a bit and then up, then left untill the end and then down. After you pass the part of the passage with the round things sticking out from the side you go down and then quickly up/right, right, up, left, up/left, right, down, left and quickly down/right and right into a small passage. Then quickly back left and down, then right, up/right, down/right, up/right, down/right, down/right. The screen will now scroll slower and you will be attacked by a persistant worm, you need to swim around keeping away from it (if it touched you it takes off a lot of health) and hit it with your sonar a lot, this gets repeated twice while the same sequence of up and down repeats, then the screen stops and you exit the level. |
|
Level 30 : New Machine (Only present if you are playing on hard)
In this level the screen auto scrolls about by itself, you must folow the screen or be crushed... To start you swim right, down, right, up and then back down again. Then back left, then down, right, up/right, down/right, up/right, down/right, then down, swim to the left side of the block. Swim down keeping to the right side of the screen , then left, up, left/up for a bit. Then up, right and down again. This time swim down the right side of the block. Swim down for a while and then right, up/right, right, down/right, right for a while and then up. Go left then up, the right before going back left again. Swim left for a while, the at the end of the passage swim up/right, swim over the first block, under the second and then swim up to the top passage and swim right. Then swim up/left past more blocks you must pass over and then under. Swim right over and under some barriers, at the end swim back the way you came left rather than going down, swim down/right, and then right dodging over and under blocks, then swim up/right, pass under the block and swim up and then right to exit the level. |
|
Level 31 : Vortex Queen
Swim down, you will see a thin horizotal blue line going accross, this is a force field that periodically turns on (it gets much wider when it activates) if you touch it when it is on your controls get affected and ecco flashes for a bit, so don't try to pass through it while it is on. At a time it is off, swim down the left side, and stop at a point just above and to the left of the vortex queen (be careful to avoid her tounge). After a period the vortex queen will rise and start sucking in globes, swim against the wall hard to avoid be sucked in, when she stops and starts spitting out chewed globes hit her with your sonar to damage her, keep hitting her as she goes back down, but make sure to pull back before she comes back out and starts eating again. You need to repeat this sequence of swimming away while she eats and then hitting her after wards untill she is defeated, after a certain amount of damage depending on the difficult level you are playing on she will lose her tounge and after that she will suck in twice as hard. After you defeat the queen you will see a few cut screen and they you will get control of ecco back in home bay, swim over to the start of the 3D stage like you did at the start of the game. The 3D stage now contains all the different enemies from the present 3D stages in earlier levels at once, get through it and you go to the next level. |
|
Level 32 : Epilogue
Sonar Map of level on normal difficulty.
Swim down and talk to the Asterite, swim back up and enter the teleport ring that will have now appeared, you will be taken to Atlantis. Swim left and down, your way will be now blocked by a 4*4 block of blocks. If you change all the blocks so that they display a face rather than being blank they will all fold into one block so you can pass. You change the blocks by changing into the side of them, the blocks react differentlly sepending on your difficulty level. On easy a charge into the side of the blocks will change even block in a horizontal or vertical line behind it. So you simply need to change downwards onto the top left row of blocks and the third rom from the left and then from the side the second row down and then the bottom row to change all the blocks. On hard a charge into a block will change blocks in a two diagonal lines away from the block you charged. So you need to too swim around and charge the blocks on the edges to change the blocks on the inside, if you think and line up your charges to change the blocks on by one you should get there by skill or luck soon enough (I'm not going to give an exact solution since if you think you're good enough to play on hard you should be able to work it out). Once you are past the blocks, swim down past were they were (you may want to push the block remaining down through the current and follow it down and then go right for a pulsar), right for a bit and then up, jump over the bricks to the left. Continue left as far as you can go, push the block at the end back right, let it fall at the end and follow it down into the vertical passage. The block will break through the barrier of blocks, swim down and then left, find the blue fish at the end and use your sonar to push it back to right, push it up the passage you came down and then right into the passage just below were the block barrier was, push it right and the dolphin will eat it, get the keysong from the barrier glyph behind the dolphin and swim back left and down. You now need to swim left and down the vertical passage just before were the fish was (If you are playing on hard there will be a barrier block barrier across the passage, you need to go back up and bring the block you used before and push it down here to pass the barrier), swim down and right slighty and down again, then right for a bit, then up at the current (back to where the block puzzle was at the start of the level), then right and then down/right, use the keysong to pass the barrier glyph. Then swim down and then start going right, you will now have to pass several sequences of rising and falling blocks, for the first just wait till the block rises and swim underneath quickly, for the second lot, carefully position ecco at the top of the passage and charge accross while both blocks are at the bottom, slowly swim under or over the slow block as it moves and then charge pass the fast block as soon as it passes you, for the final block just charge as it falls, then swim left to exit the level. |
|
Level 33 : Fish City
You play this level morphed into a school of fish, you will be attacked by dolphins who will eat the fish in your school, if they all get eaten you die, but if you pass near another school of fish some of them will replace any of your fish that have been eaten. As a school of fish you cannot rise or fall fast, don't just stay in one place and press down - doing that will make you a sitting duck for the dolphins, I find the best tactic is to swim rapidly left and right as you go up or down this makes you very hard for the dolphins to hit. The layour of the level is simple enough, you just need to follow the passage avoiding the dolphin's and head towards the right being careful not to get sucked into passages with currents heading back left. You basically just swim right, down, right, up, repeat untill you get to the end metasphere and exit the level. |
|
Level 34 : City of Forever
Sonar Map of level on normal difficulty.
There are so many differences between the hard and normal/easy versions of this level that I'm going to write two solutions, one for easy/normal and one for hard, so read which ever one applies to your difficulty level selection... This level revolves around vortex lavas which infest the level, they are powerful you cannot kill them, stay atleast half a screen width away from them or they will turn about and crush you. Your progress in this level will be blocked by barriers, they only open when a vortex lava passes through them so you need to follow behind a vortex lava close enough to get through the barrier before it closes but far enough back to avoid getting attacked by the the vortex lava. Easy/Normal - When you start, swim left and up the second passage slowly until you see the vortex lava, follow it slowly right, down, left and get through the barrier after it before it closes. Then swim down for a while, left for a bit, down for a bit, right and then down, left, down. At the bottom a vortex lava will emerge from the left passage, quickly swim right, up, left and down to get behind it, swim left untill the passage floor starts to rise, swim up slightly, you should see a block, push it down and then push it right untill you get to a vertical passage with a current coming out of it, use the block to go down the passage. Swim right at the bottom, and then up, then left along the very bottom of the chamber, you will see a vortex lava swim over head, swim up and follow it, right, up, right, get through the barrier while it is open and then swim down into the teleport ring, to start the ending sequence. Difficult - When you start, swim left and up the second passage slowly until you see the vortex lava, follow it slowly right, down, left and get through the barrier after it before it closes. Continue left untill you get as far left as you can, Follow the vortex lava, up, right, dowm, right and down, get through the barriers. Swim down and then left at the first left passage, swim down carefully and follow the vortex lava right, up, right, down into the narrow passage and left, sneak through the barrier but stay behind the lava as there is a second barrier, swim right, down, right and sneak through the second barrier. Swim right and down, you will see a vortex lava, follow it, right for a bit, up, right, down and back left to where you first saw it, continue left and sneak through the barrier. Swim up and get ready to push the block off the ledge, as soon as the vortex lava swims below push the block down and right out the barrier before it closes. You will probally be too slow to make it, push the block up against the barrier, then swim up and right slighly, as soon as you see the lava swim down and hide in the corner were the block was and the lava should just pass over you. Turn ecco to face the left and wait for the lava to pass and follow it, try to get the block through the barrier, repeat this untill you finally get the block through. Push the block right untill you get to the passage with the current coming up out of it, use the block to go down against the current. Swim carefully right at the bottom untill you get up behind a lava, follow it, right and then up, use it to pass two barriers, then follow it right, up, left, and quickly swim past the lava as it turns and get through the next barrier. Swim up, then left along the very bottom of the chamber, you will see a vortex lava swim over head, swim up and follow it, right, up, right, get through the barrier while it is open and then swim down into the teleport ring, to start the ending sequence. |
Return to Main Walkthroughs Page |
| Back to main page |
.jpg)